The Friendly Bee

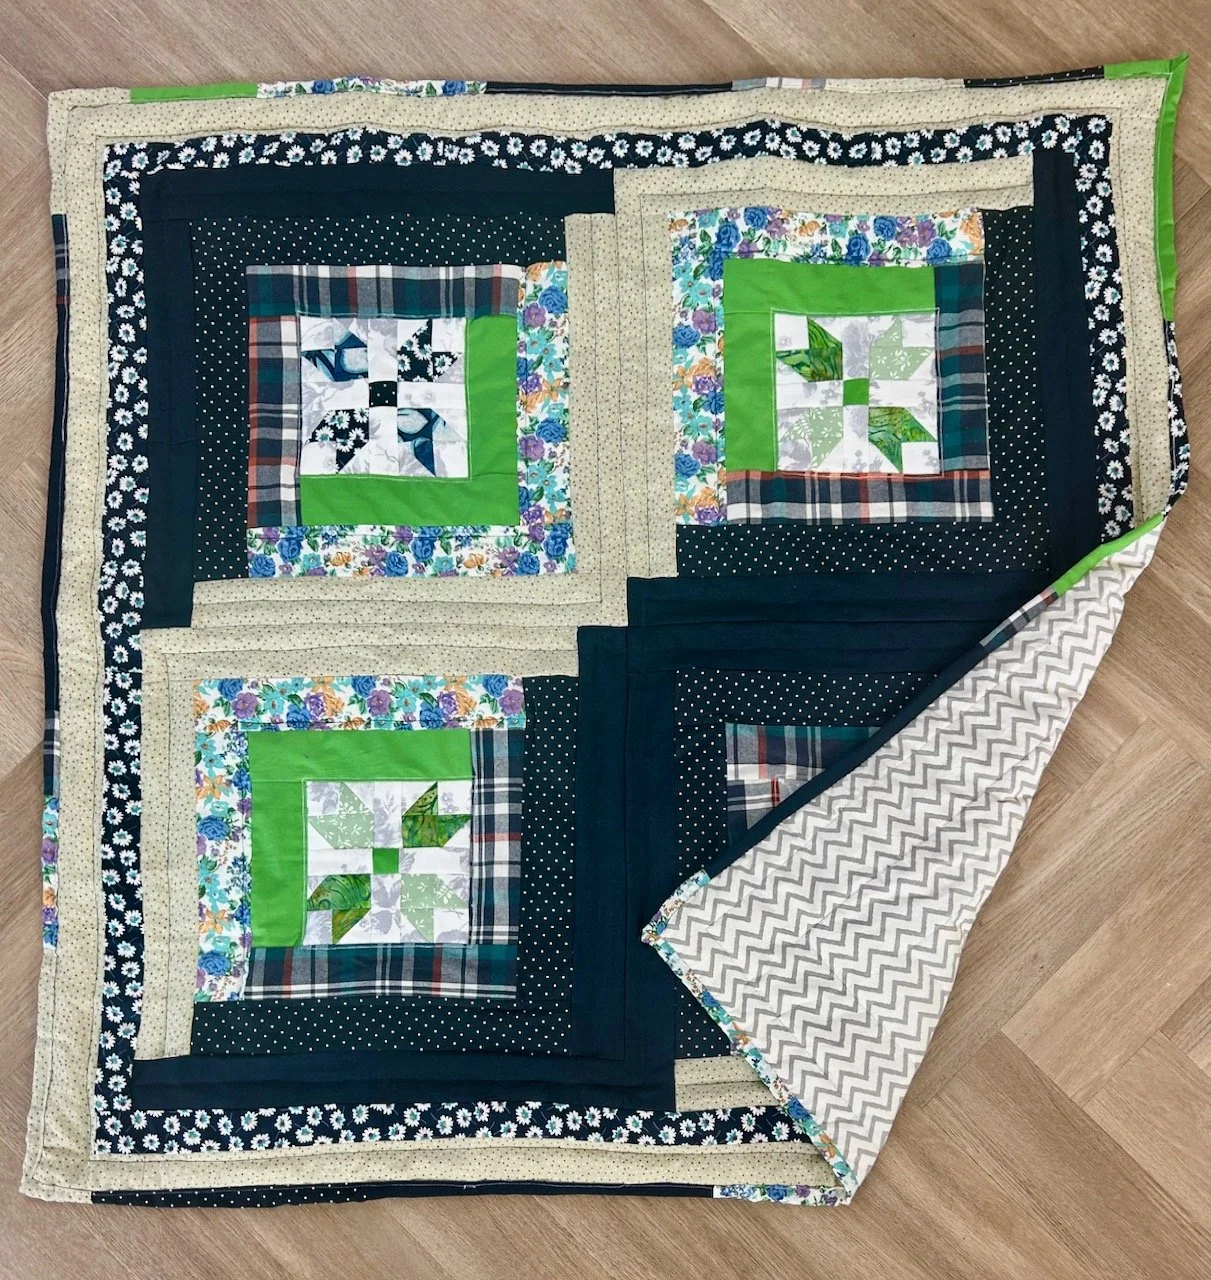
I’ve updated the final section of this post now that the quilt is fully complete. I’d hoped to finish this shortly after our holiday, but what with life, the heatwave it hasn’t happened until now. Though the heatwave has gone, it’s still warm in my sewing room - and plenty warm enough to have a quilt on my knee sewing the binding. But It’s finished, and I think it looks good.

I’ve made another quilt as part of my quilting ‘stretch’ project this time using the April block from Sherri at A Quilting Life’s mystery block a month. As I said then I don’t know if I’ll manage to make a quilt a month, but I won’t really know unless I try…

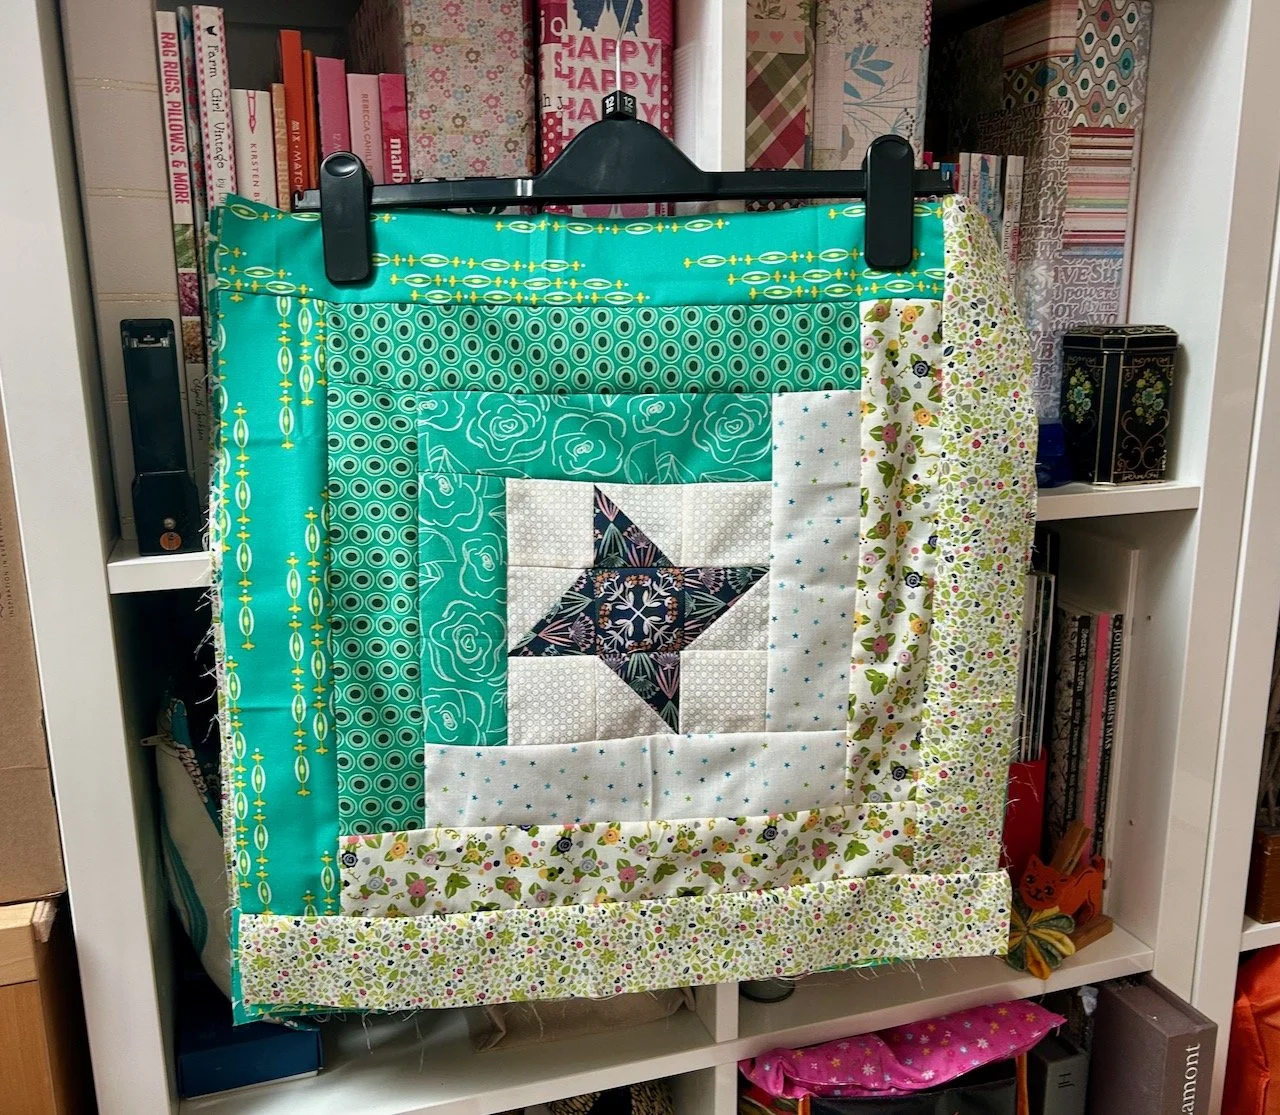
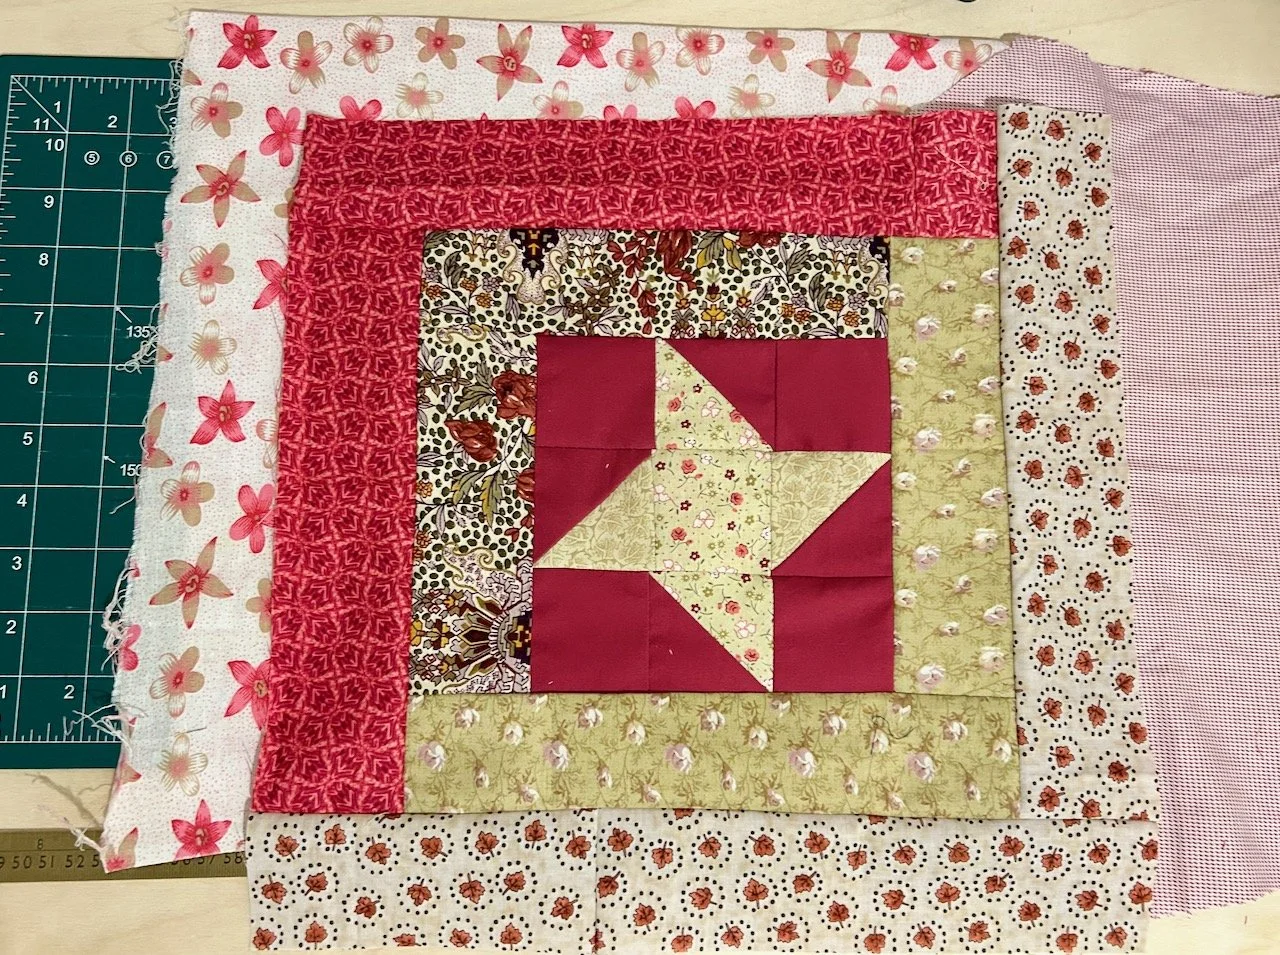
When I saw this one was another star I questioned my commitment to my challenge, and also my sewing ability. But, it wasn’t as bad as I thought it would be, so phew.

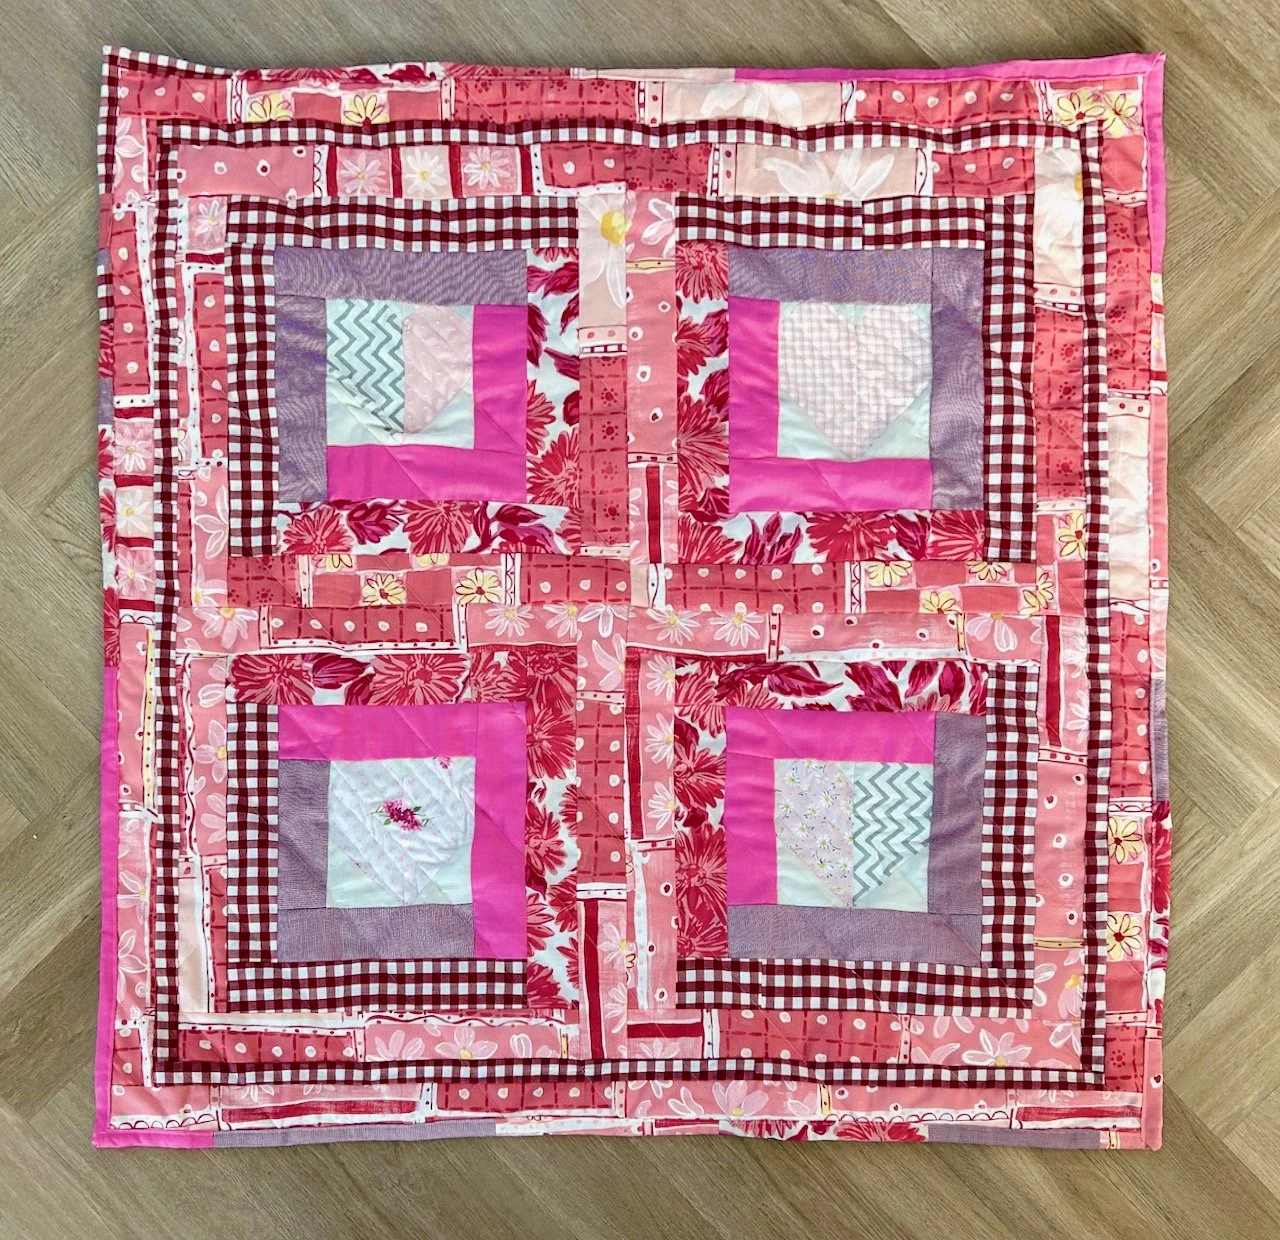
My sixth charity quilt

As I said above, I wasn’t really looking forward to tackling another star block - the February vintage star block had many small pieces, which made me question why I cut up pieces of fabric to sew them back together again! Which is a fair point, when you look at it like that, but in for a penny, in for a pound and all that.

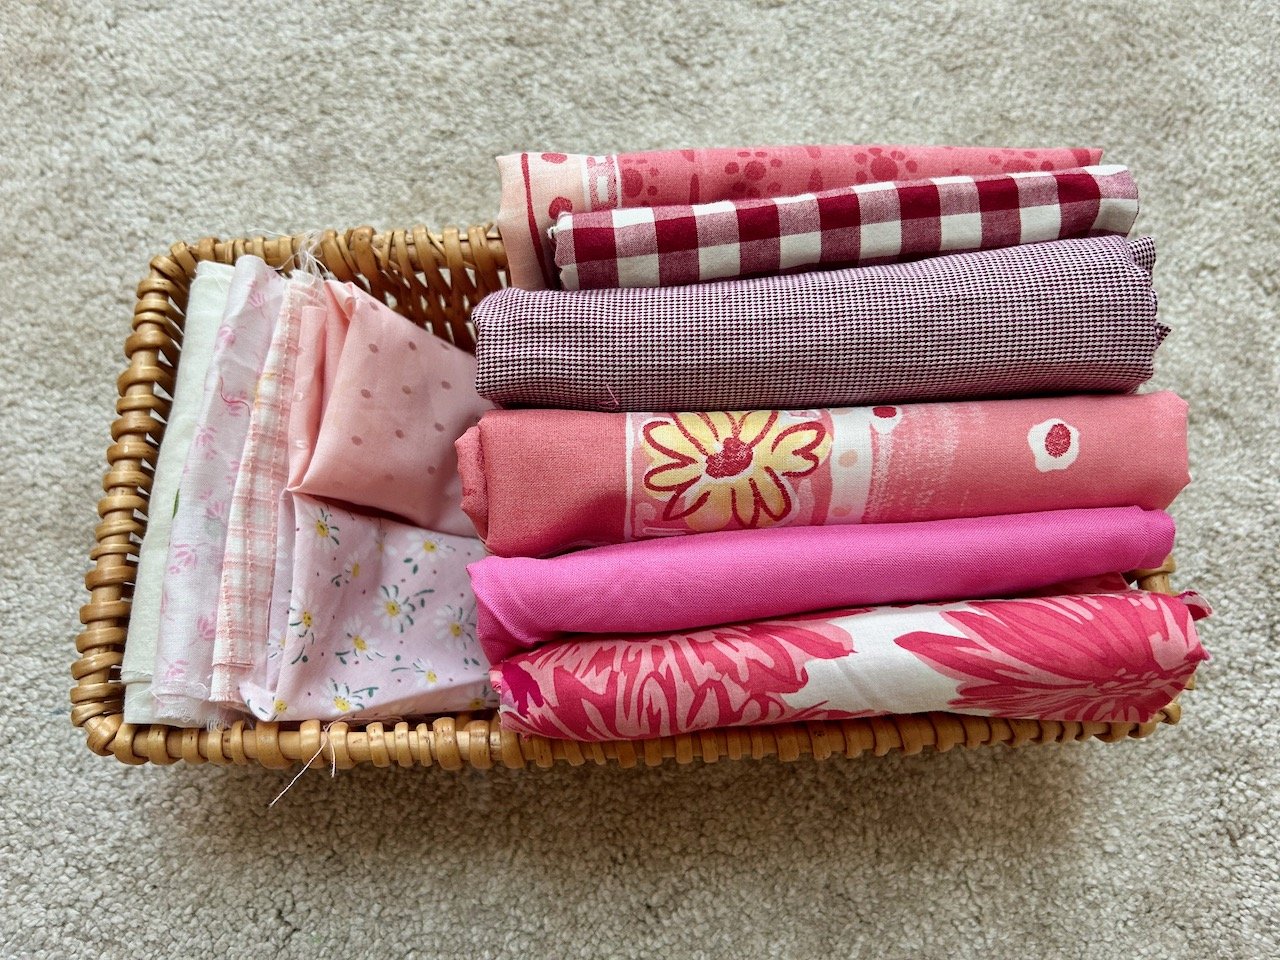
My original intention was to pull ‘yellow’ fabrics from my stash, as I thought this might lift my mood - but as you can see they ended up more beige than I expected.

Well not entirely beige, there’s some gold and rust colours in there too. The fabrics for this quilt included some more of the old orange curtains and of the duvet cover I used as backing last month, some checked material which I used back in January for the cute little houses, two vintage pillowcases and some new-to-me fat quarters bought for a much reduced price at my sewing group’s recent stash sale, plus some ‘wood effect’ material which dare I say it, I wasn’t in love with and some much smaller scraps which I used as the background on two of the blocks.

But actually it wasn’t anywhere near as daunting as I thought it might be once I started. Now isn’t there a life lesson in there?!

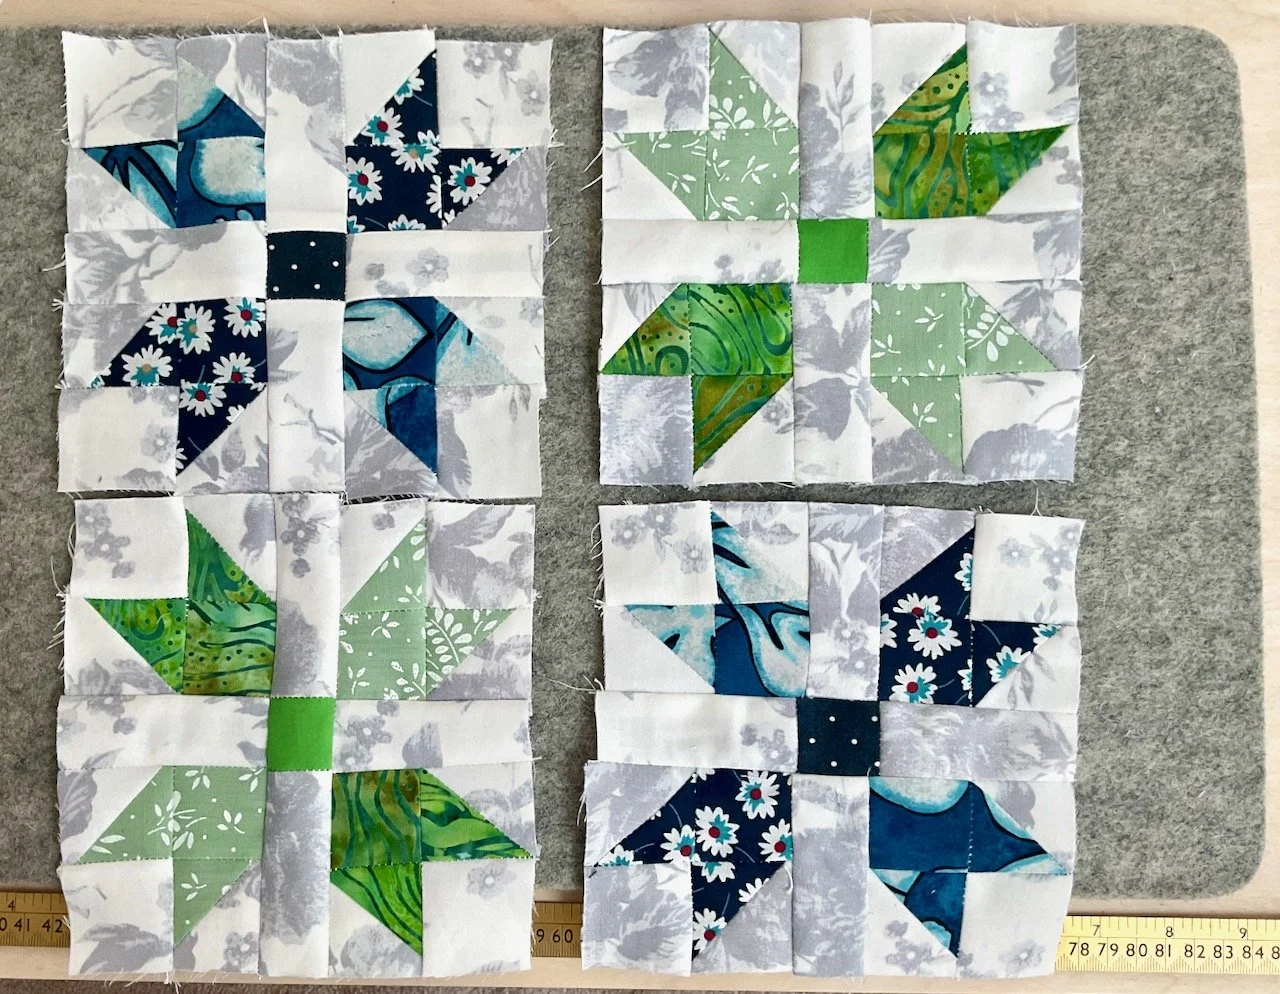
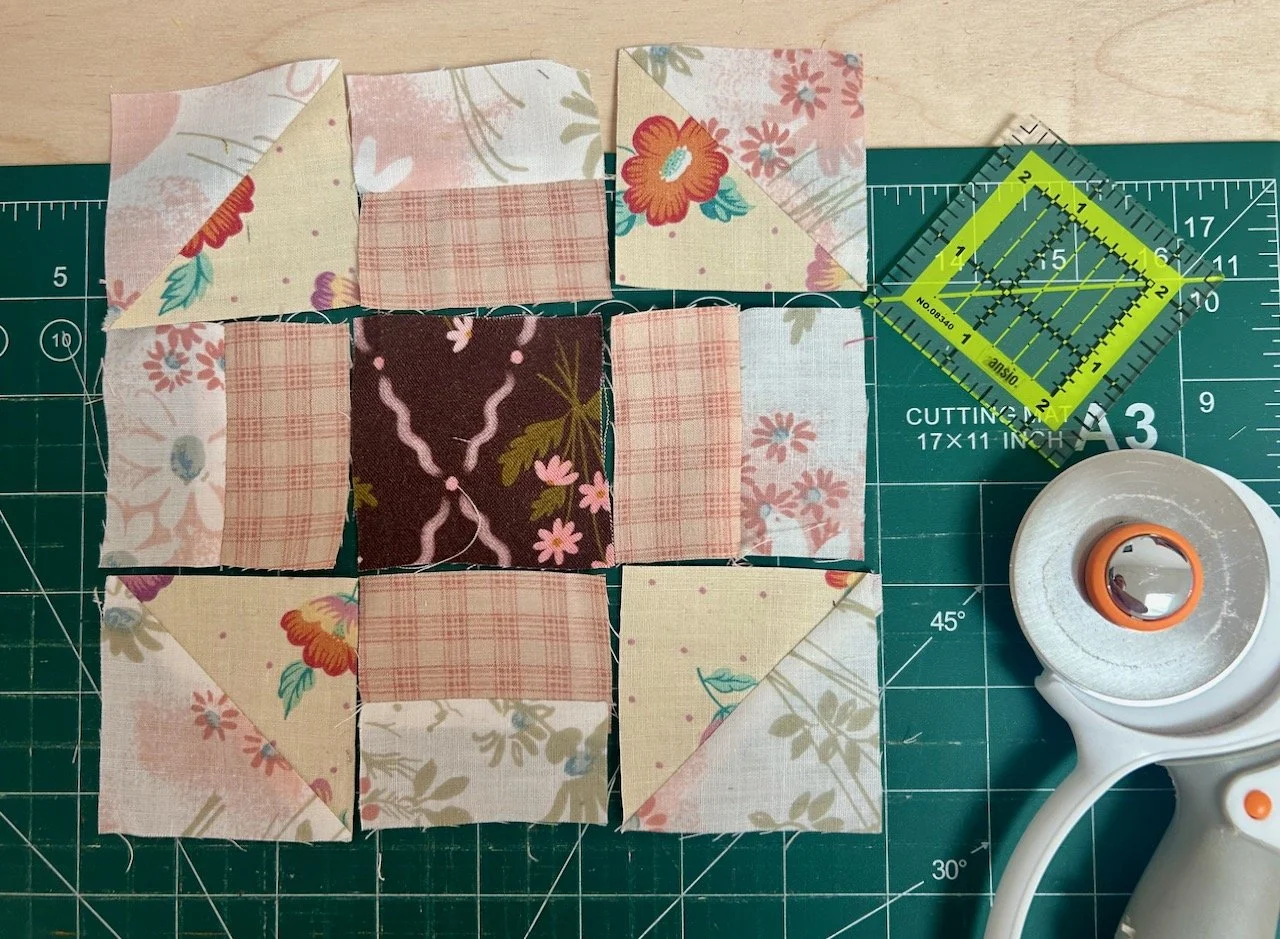
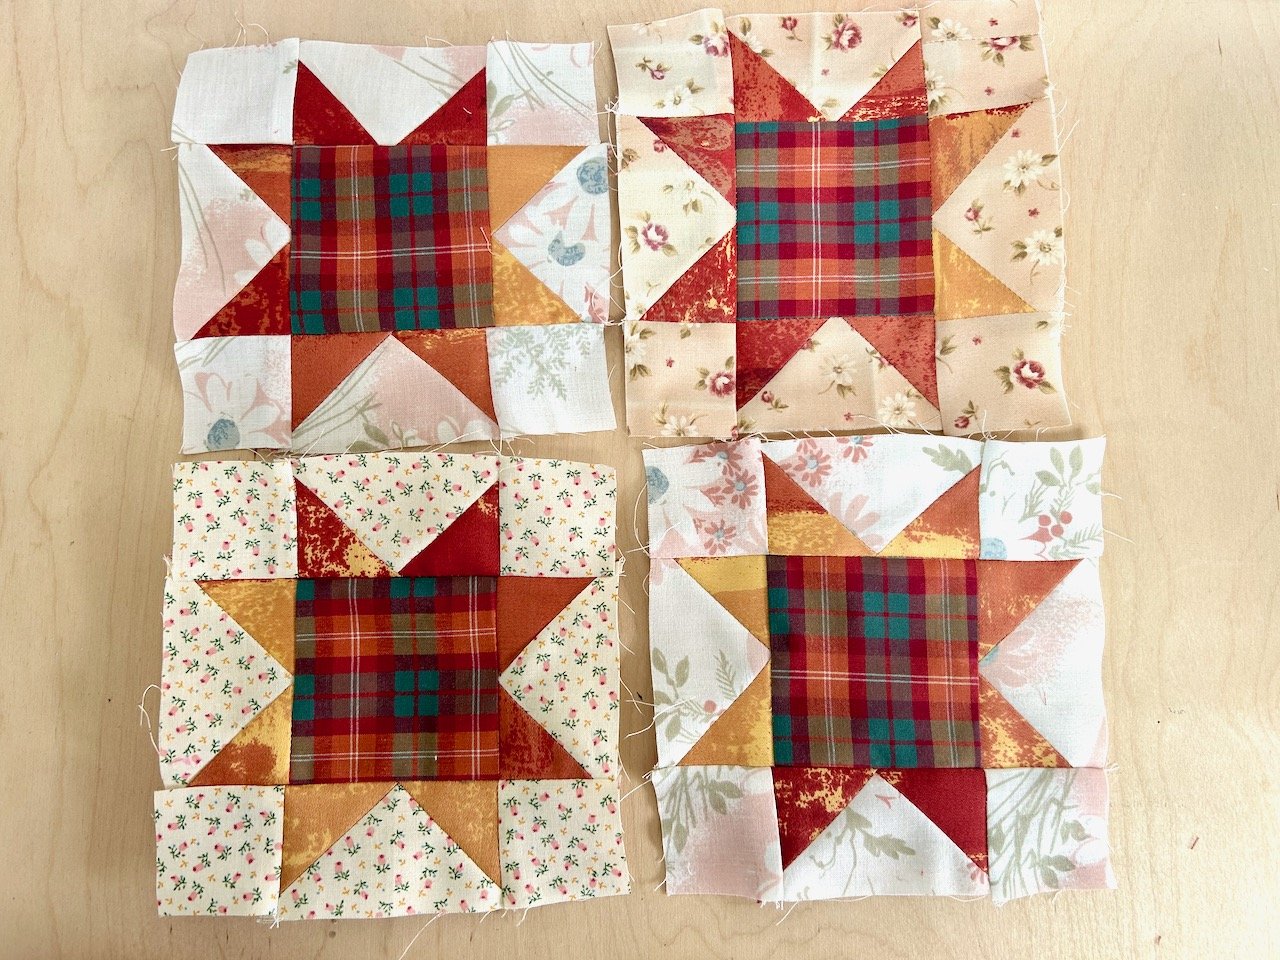
The blocks surprised me and came together relatively quickly.

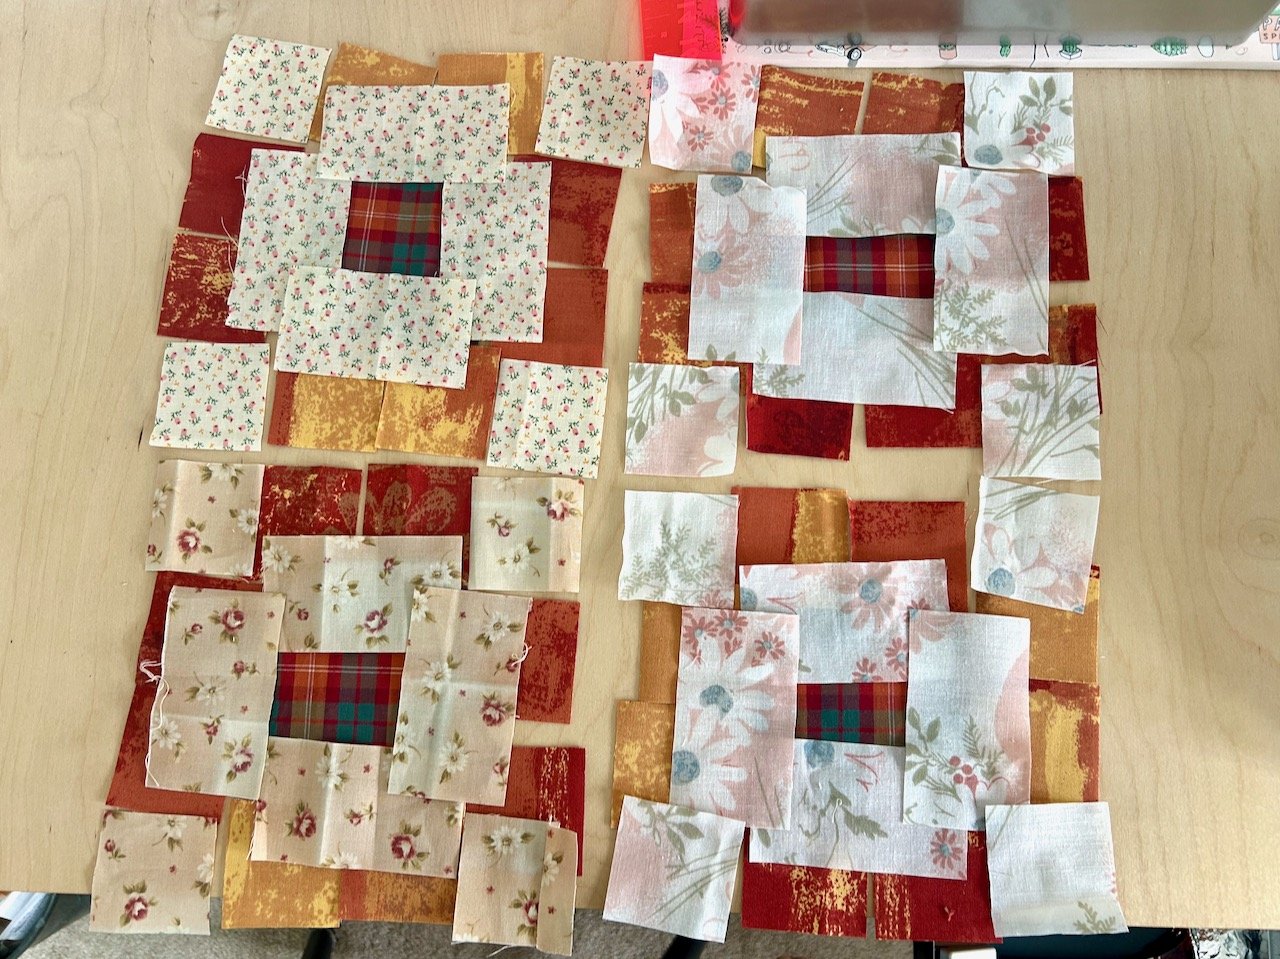
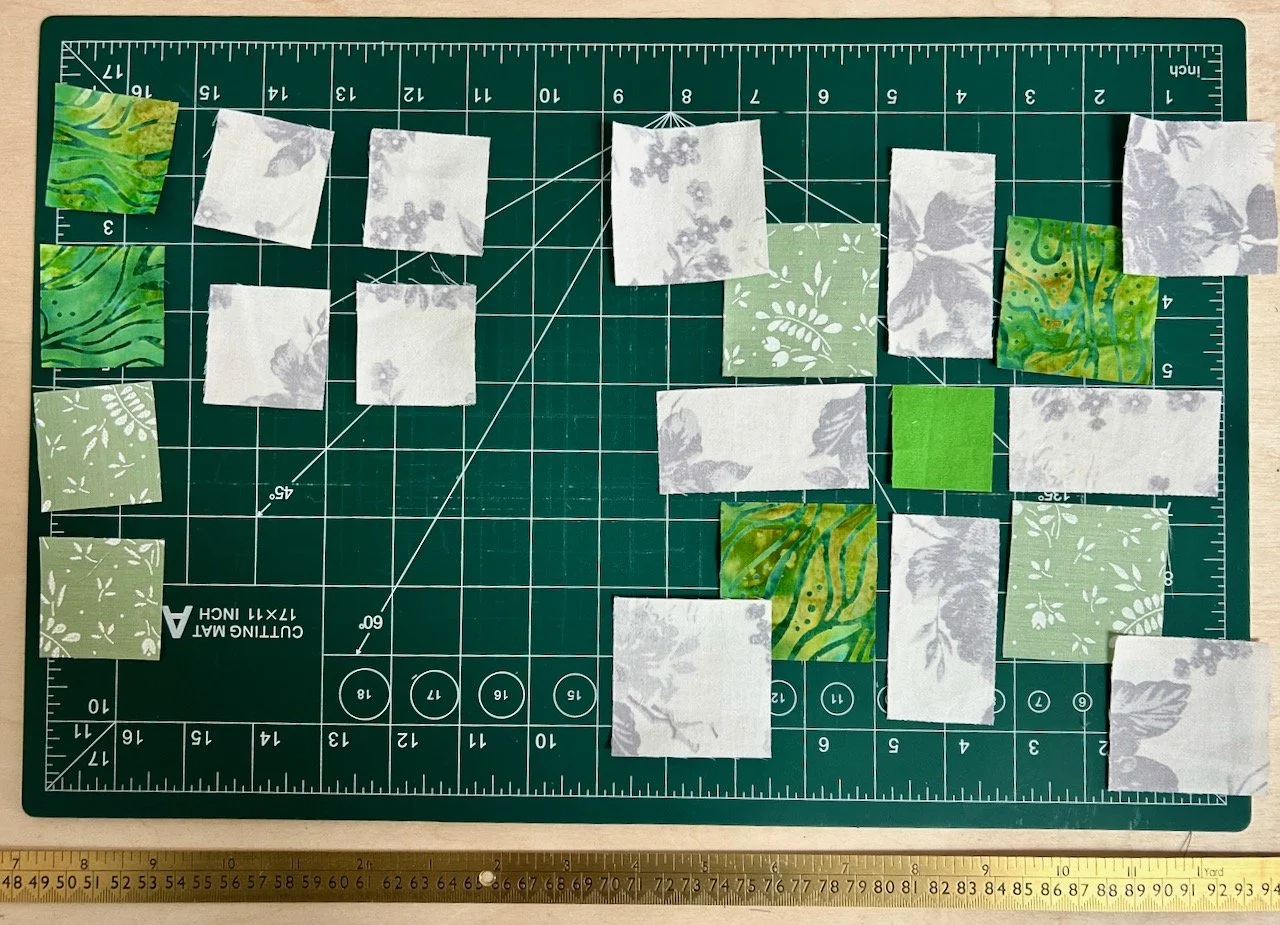
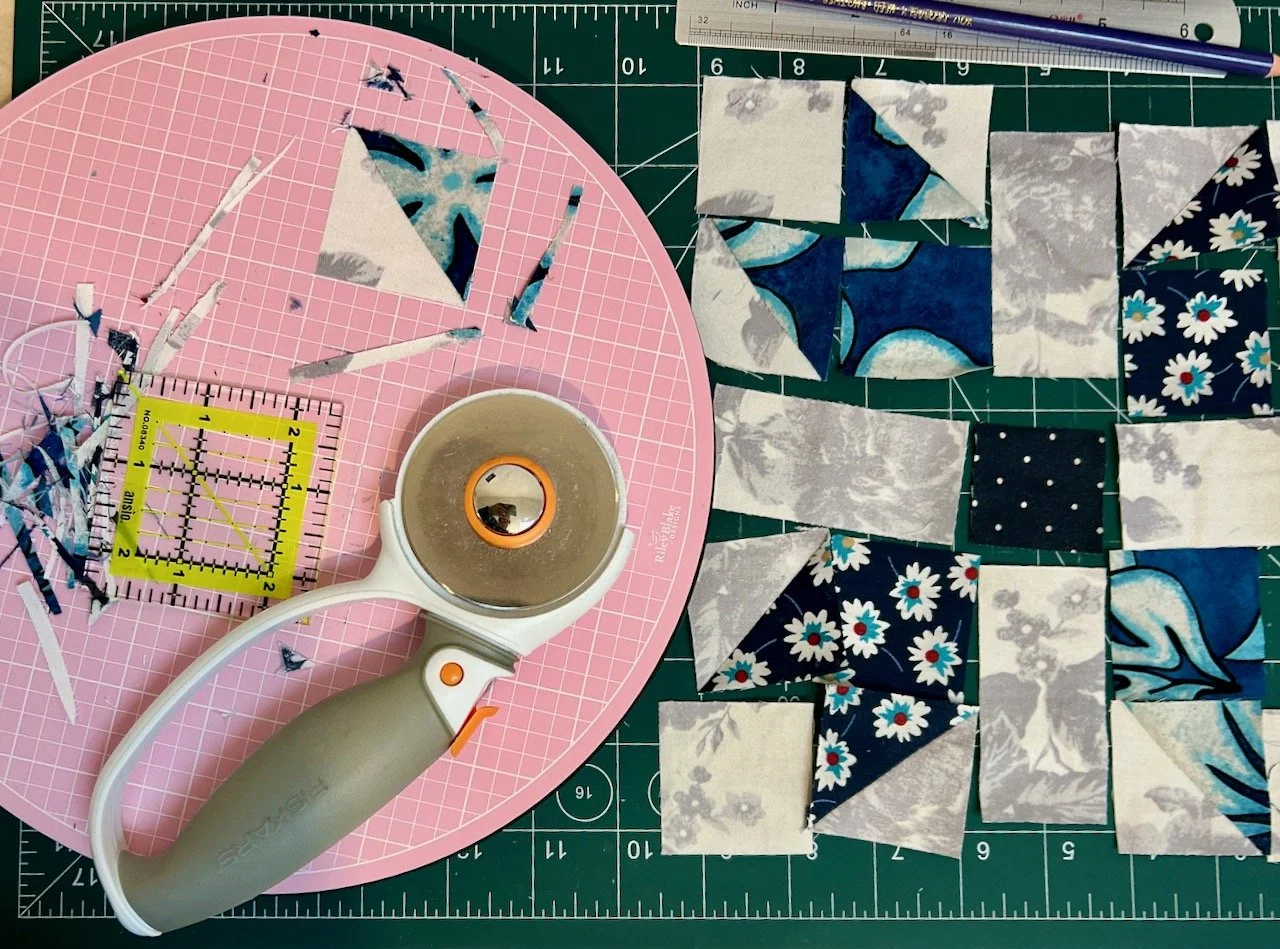
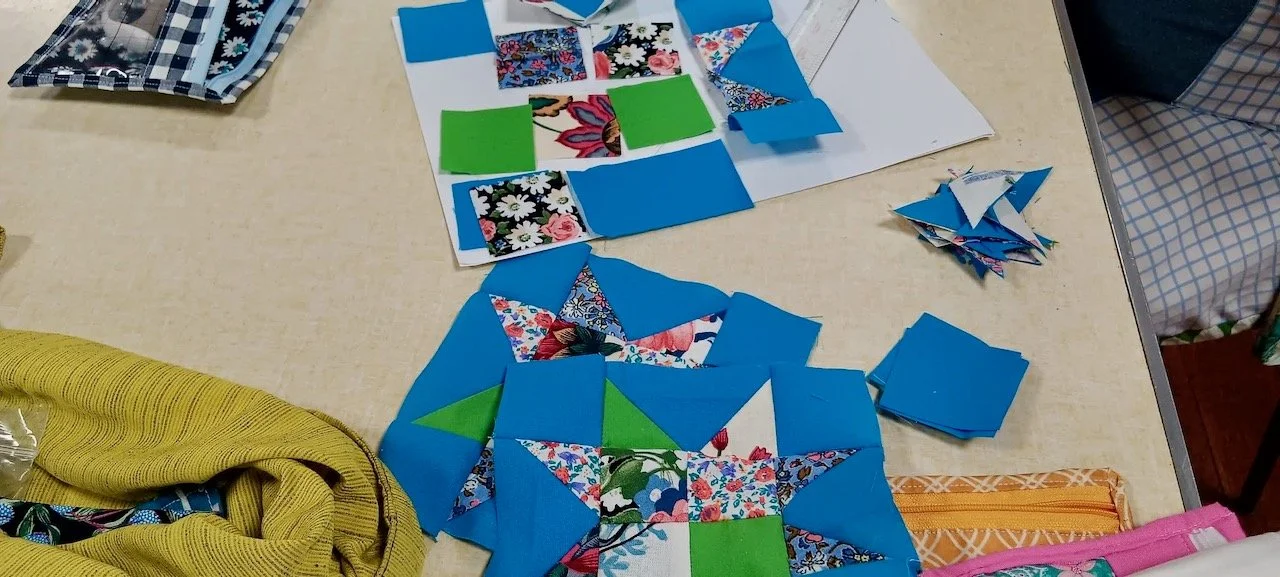
I find it easier to lay all the elements of the blocks out in their approximate location - this means I don’t either over, or under cut the pieces I need, and it gives me a look at how the blocks might work.

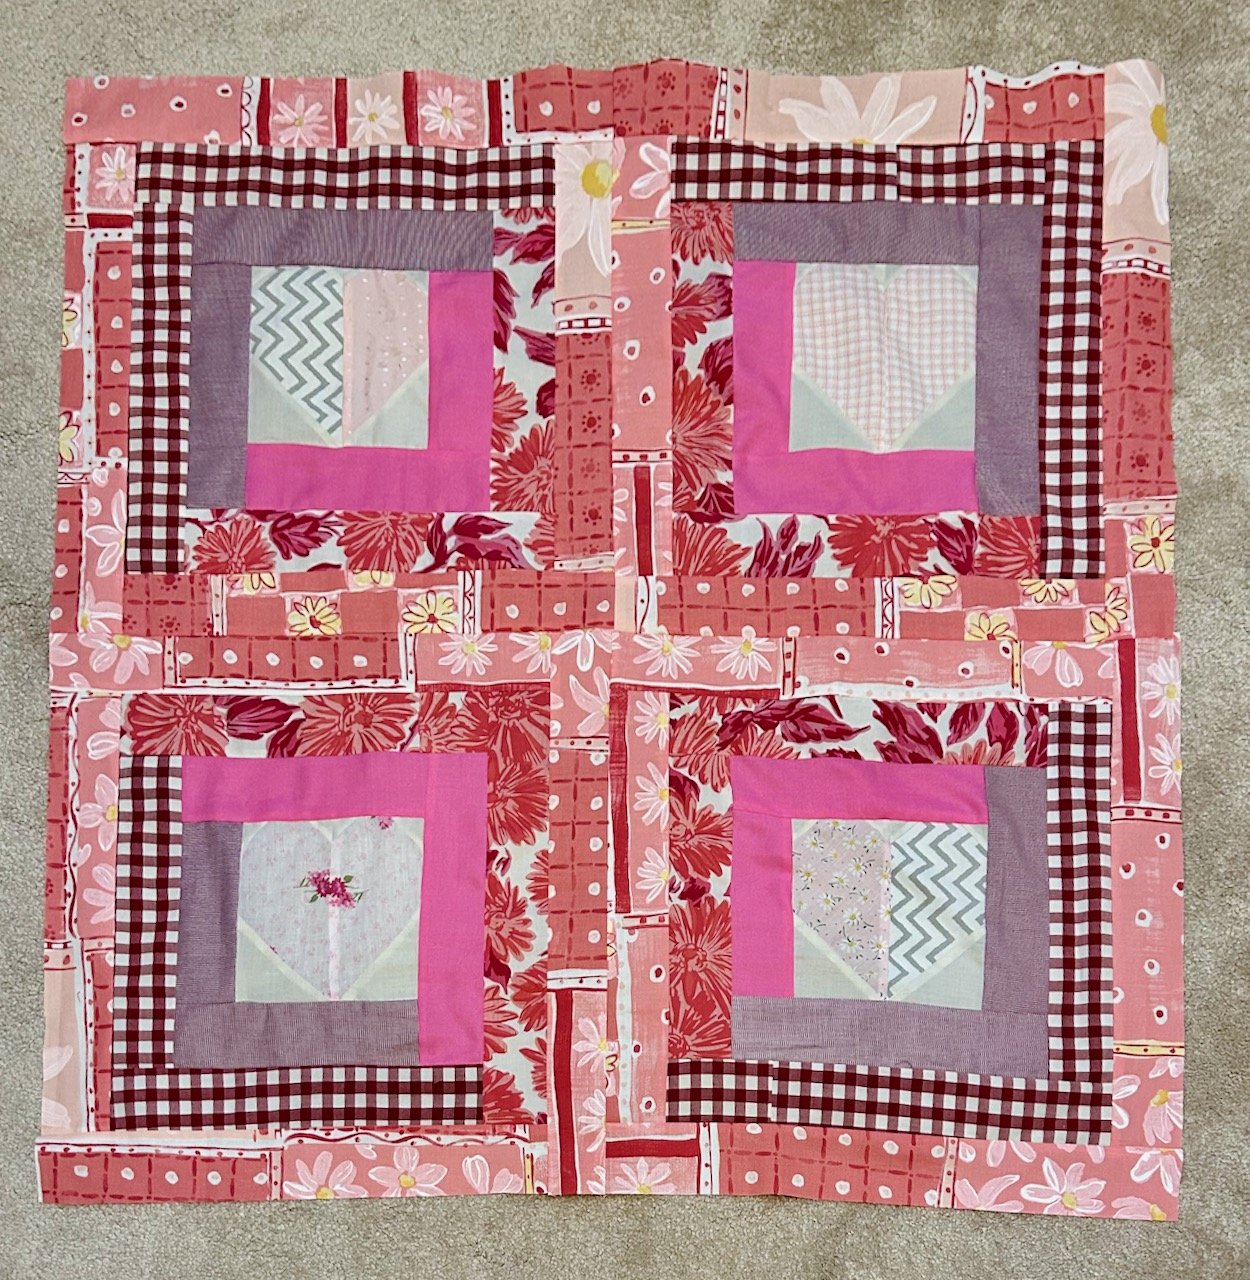
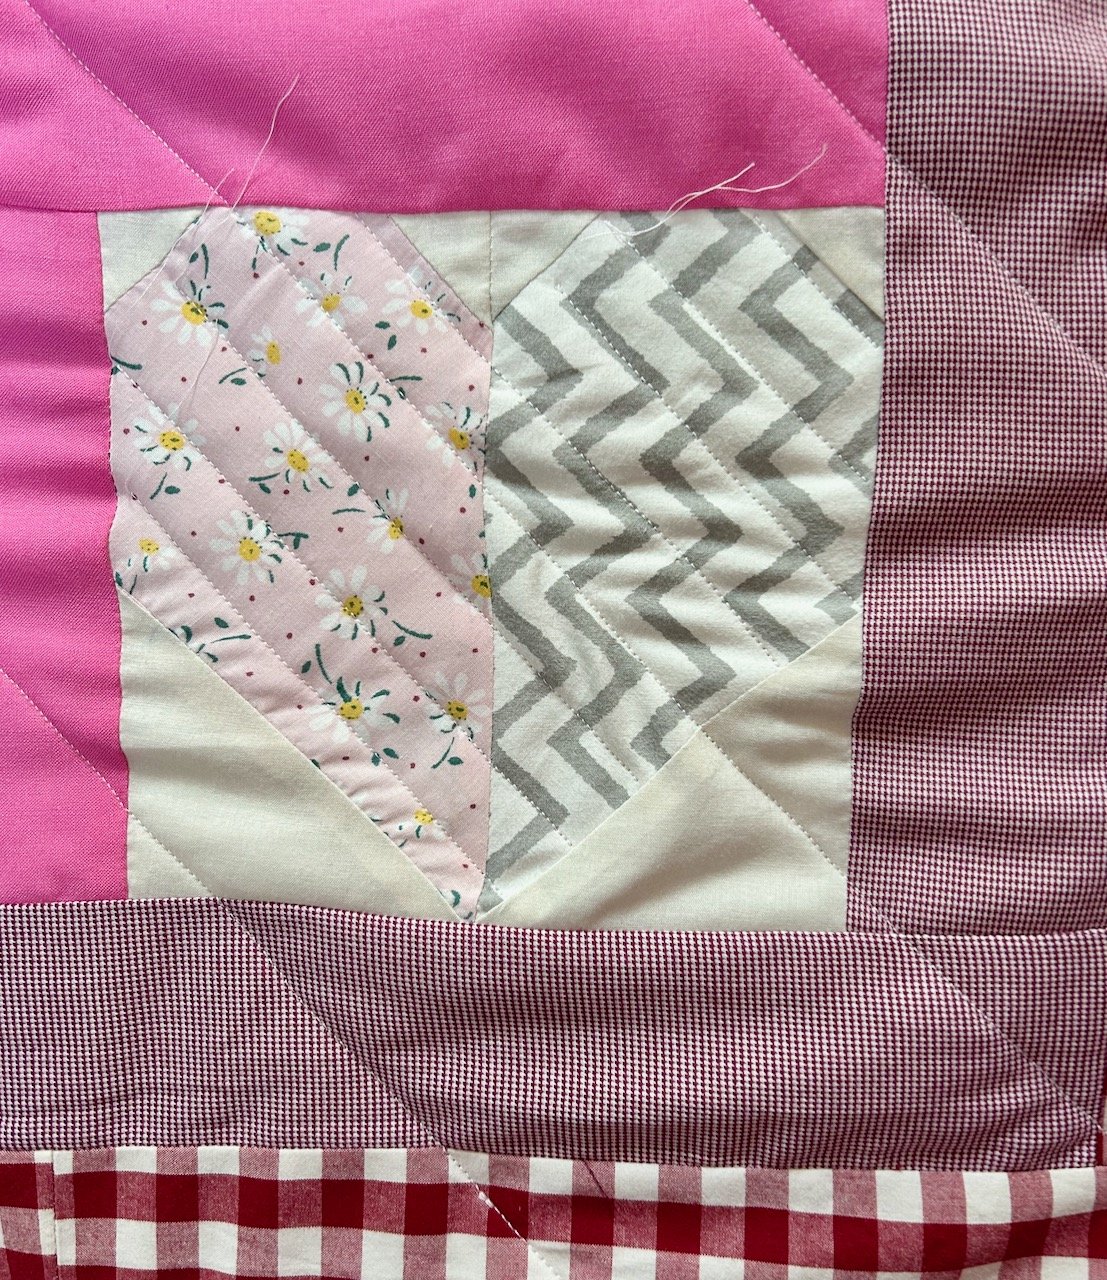
I think the colours work well together - I needed to add the pink flowered background (used on the two blocks on the right) as I didn’t have enough of the fabric used for the blocks on the left, but the colours tone.

And with a bit more sewing I had four friendship star blocks.

Introducing the bees

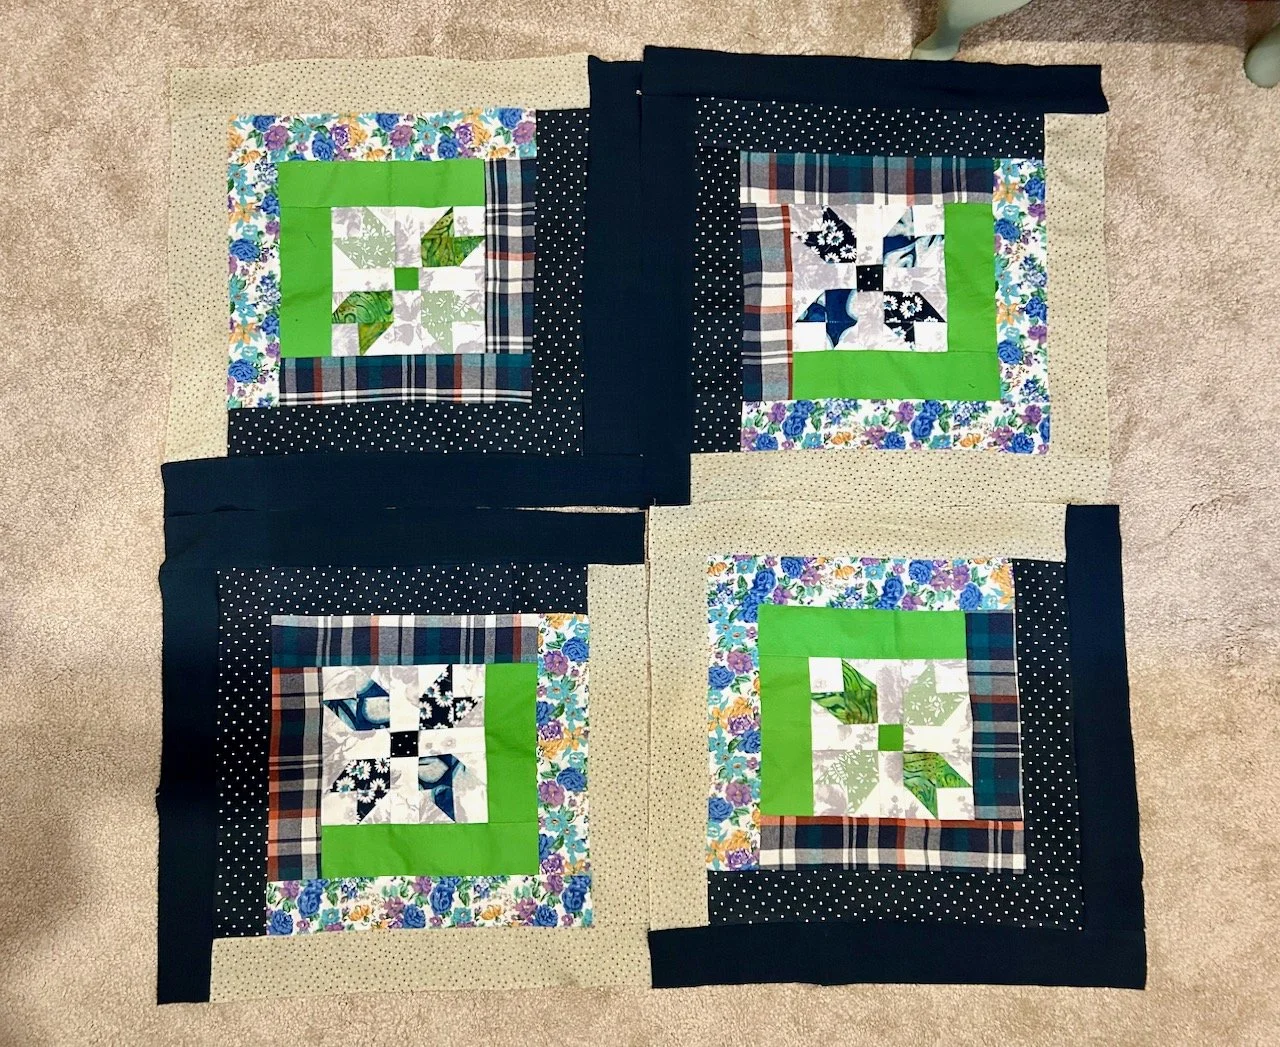
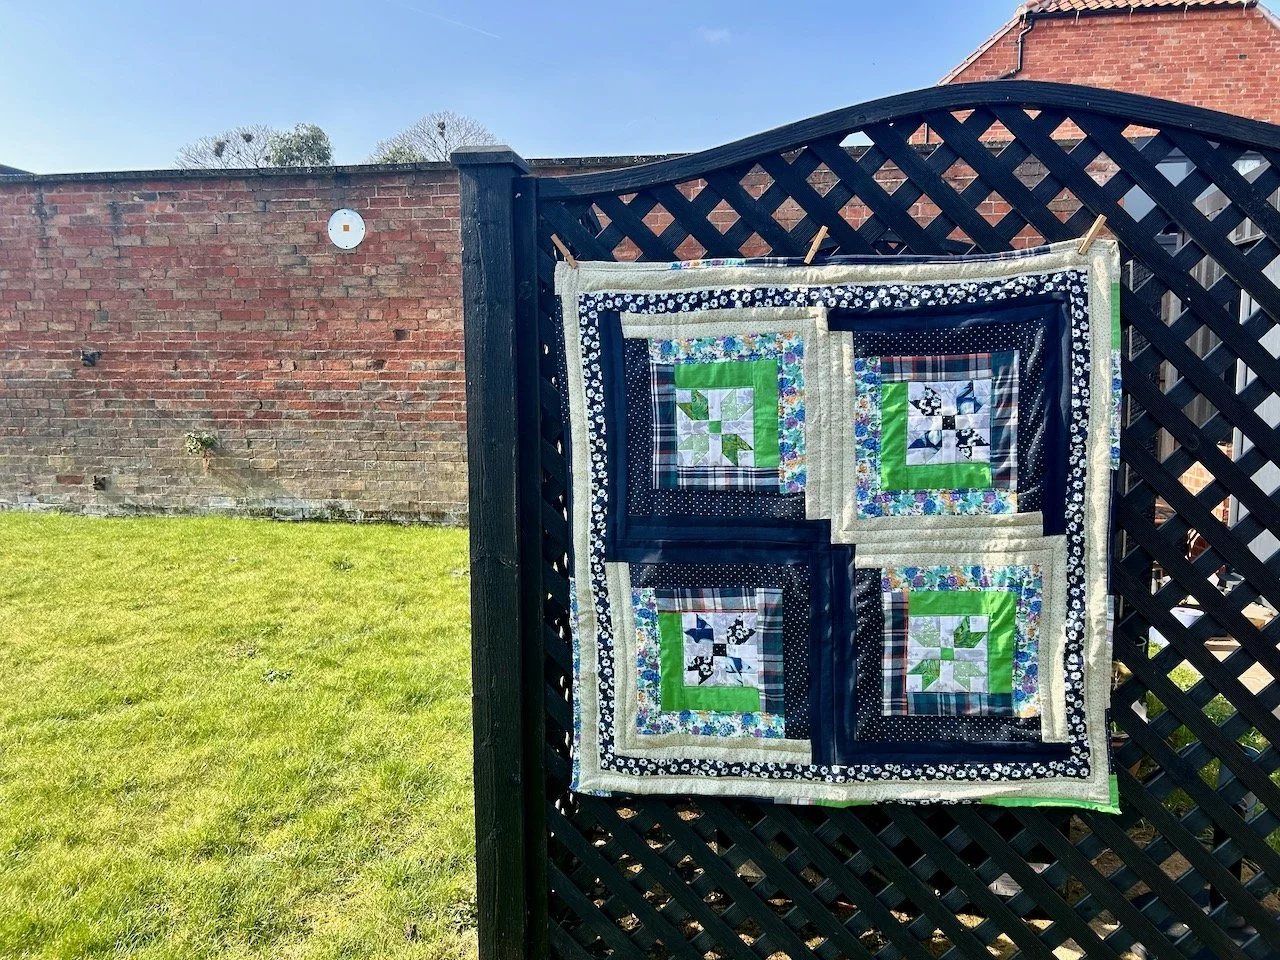
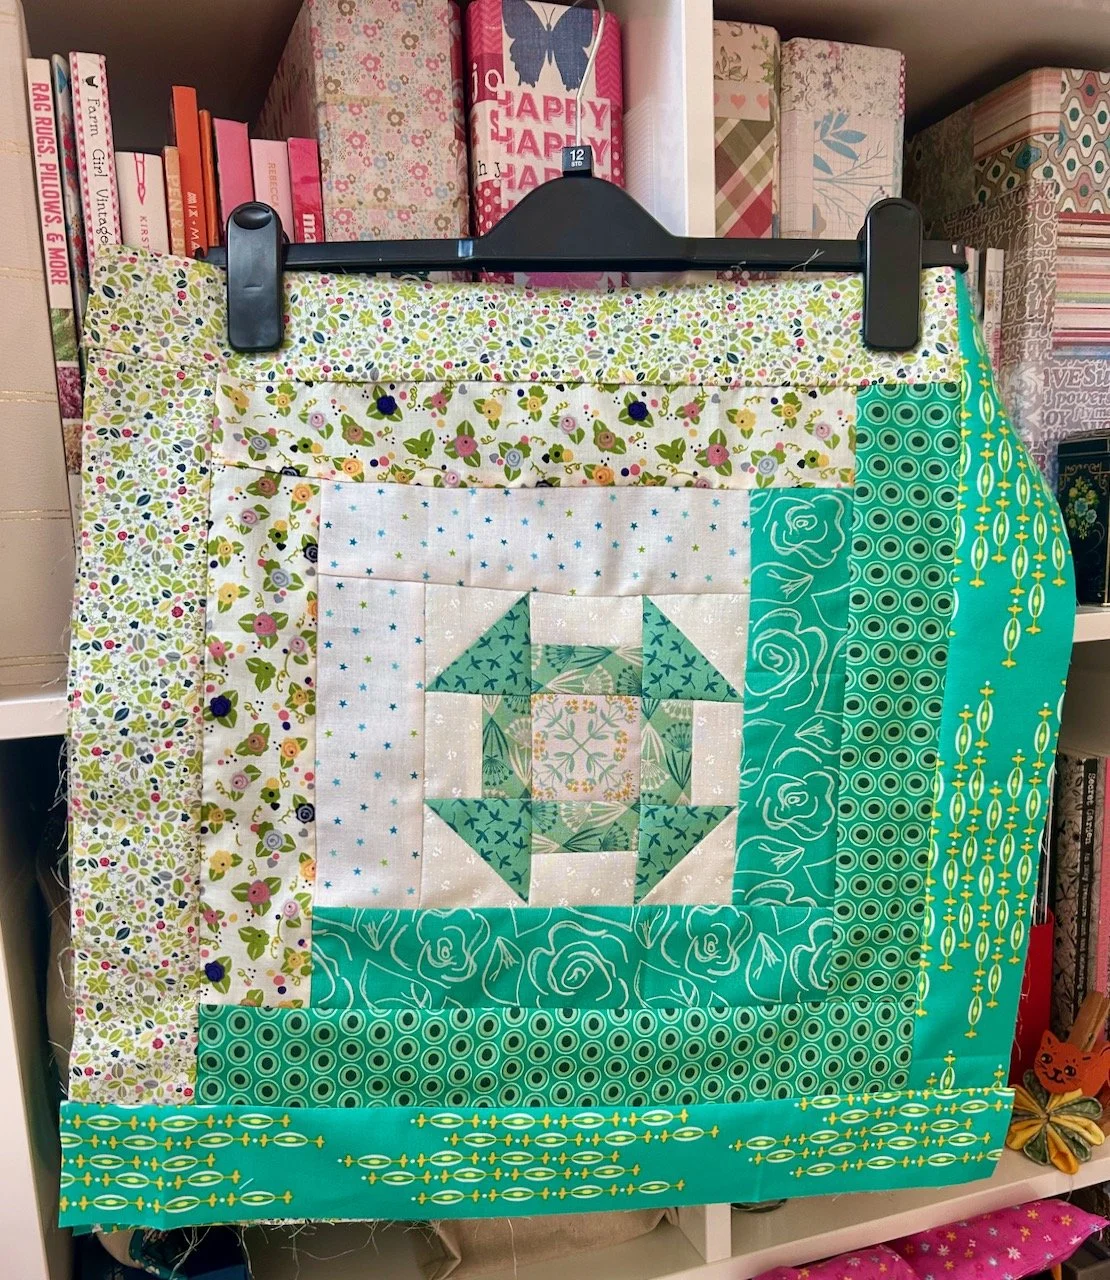
You’re probably wondering why I’ve named this quilt the Friendly Bee, well the border fabrics should help explain that.

Laying out the border fabric - with two bee fabrics - to see how they work together

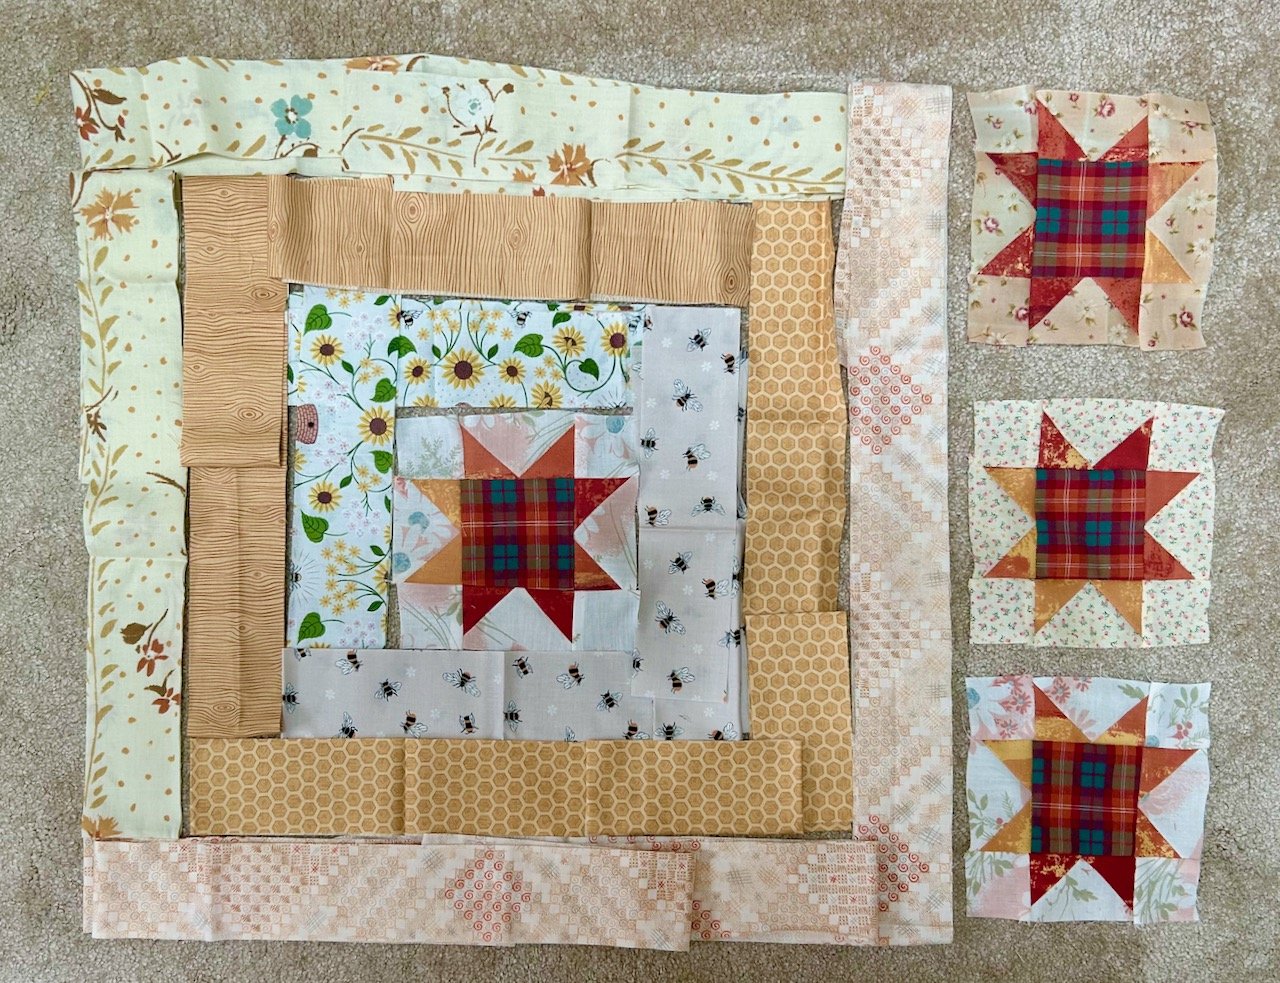
As you can see both of the materials bordering the Friendship star have bees, hence the Friendly Bee name.

The ‘wood effect’ fabric actually works well in this quilt, and tones nicely with the honeycomb fabric used alongside it. The two outer borders are the vintage pillowcases, and as they’re the material I had the most of they were obvious choices for the longer borders.

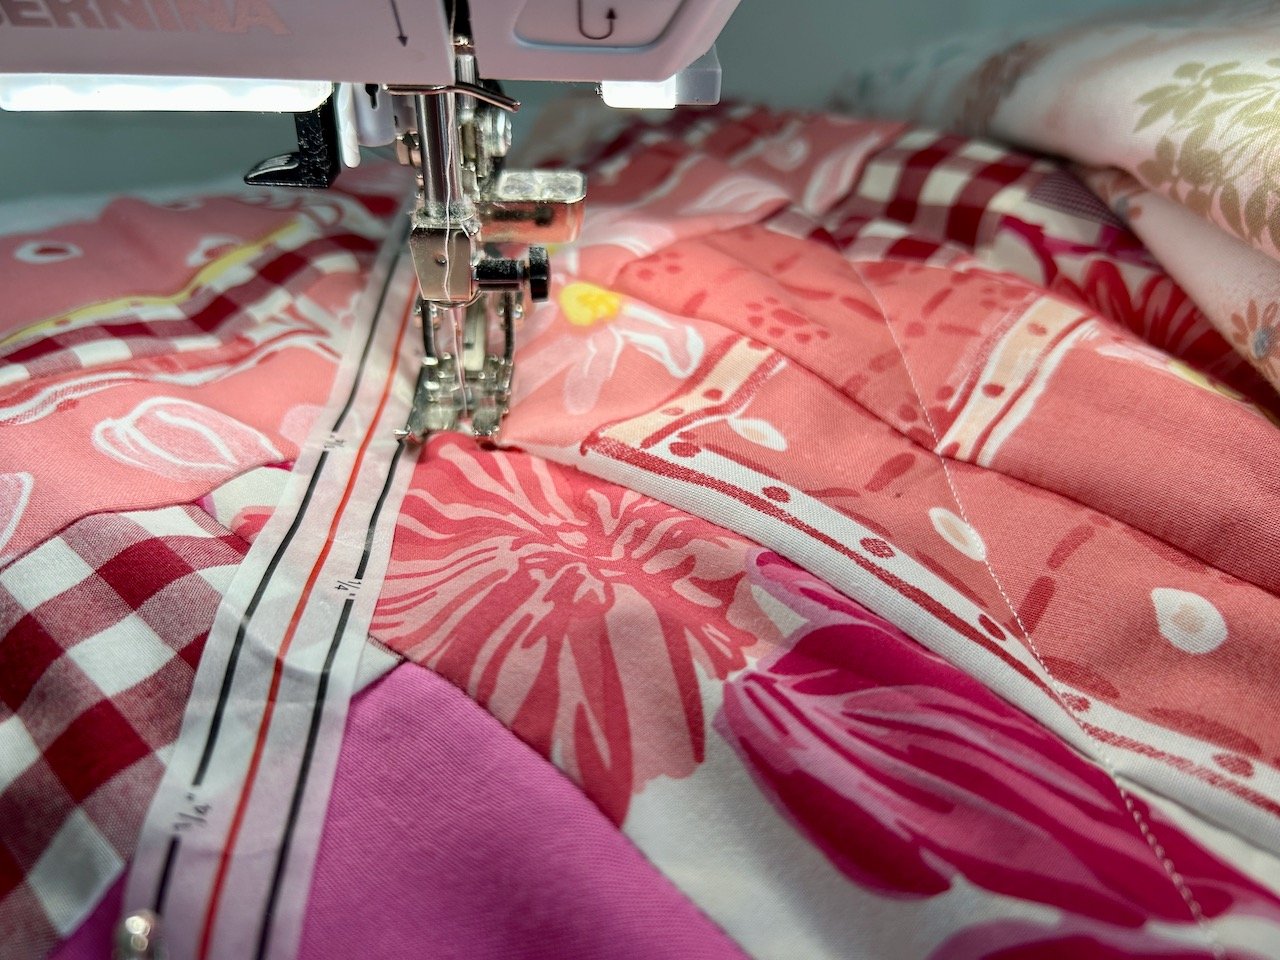
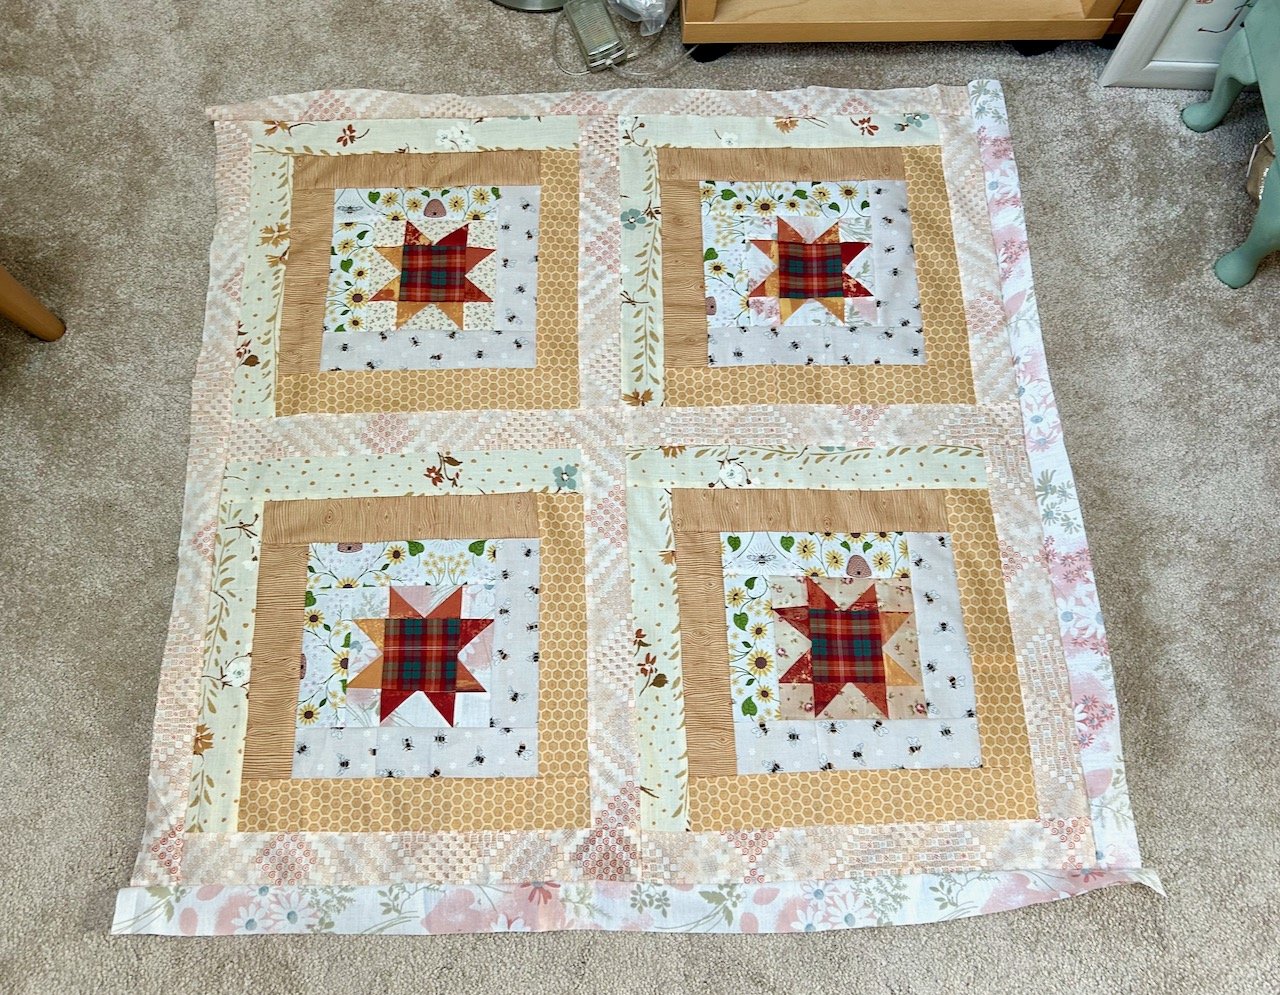
With the blocks attached I added the outer border, this time using two different fabrics - and I think this works, I wasn’t keen on having two of the same pattern together, so by using the pink flowered material again here I’ve avoided that.

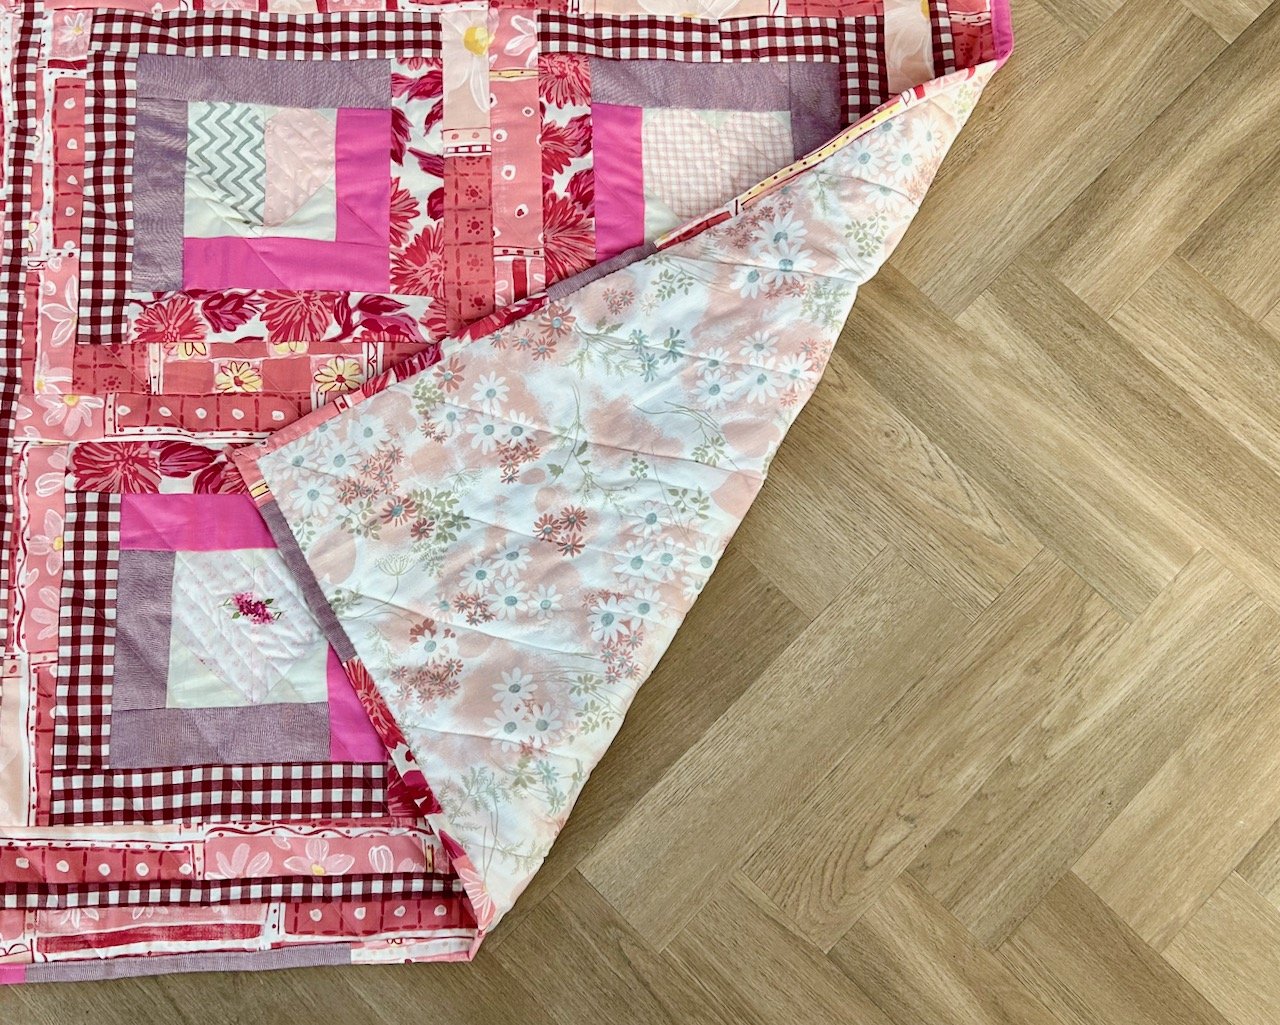
Finishing the quilt: Update

Last month I opted to quilt the Four pink hearts and a hug quilt with diagonal lines, and it worked well. My plan is to try that again, so that’s what I’m part-way through doing for this one too. Yes, this quilt isn’t finished but it’s pretty close - I’ll update this post when it’s actually finished.

I knew that some months it would likely be harder to fit in making a quilt around everything else that life has to offer, that’s why I’ve called it my ‘stretch’ project. I’ll let you know if a few weeks how it turned out.

Update

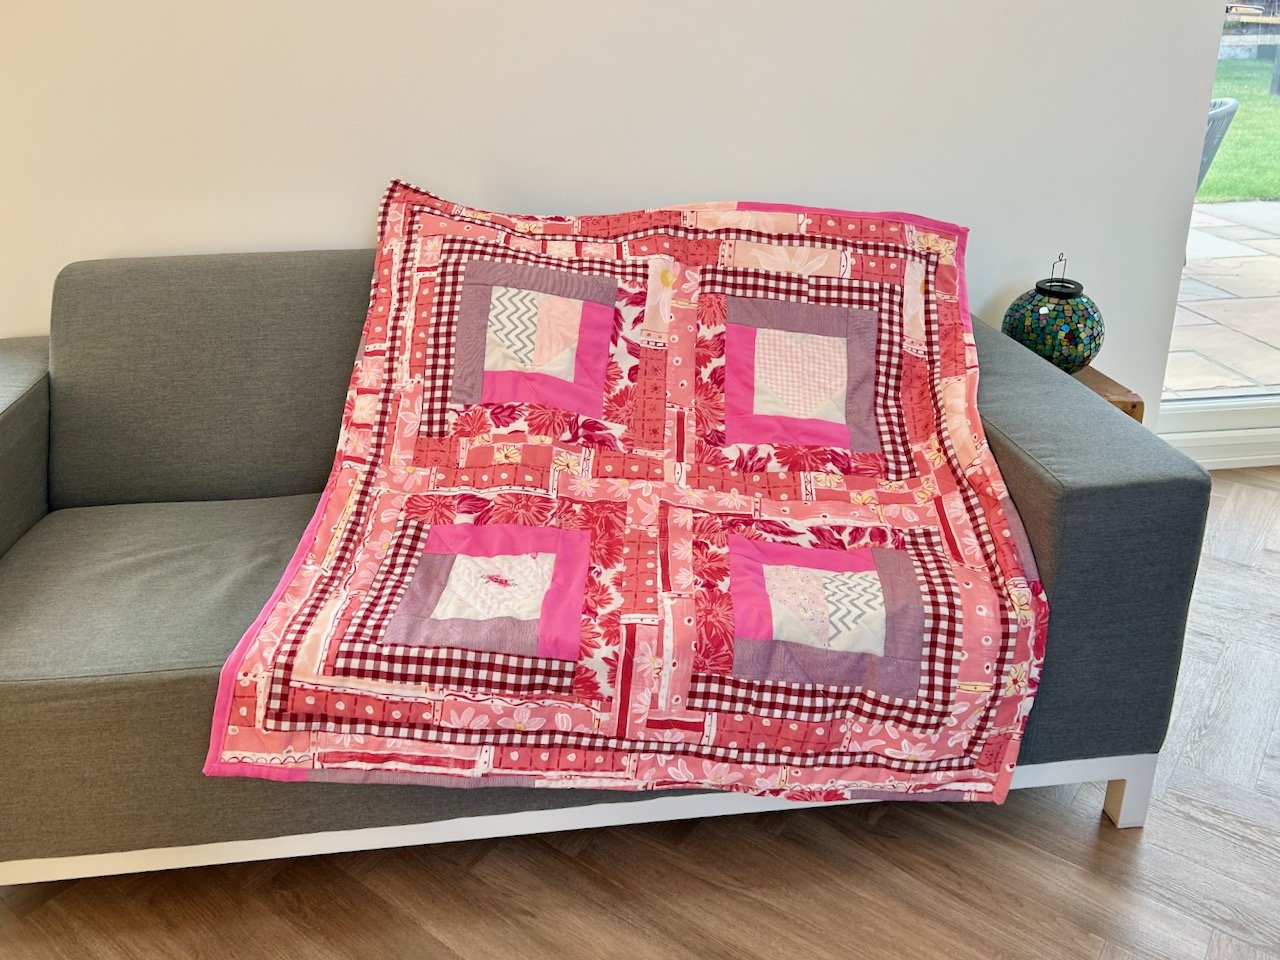
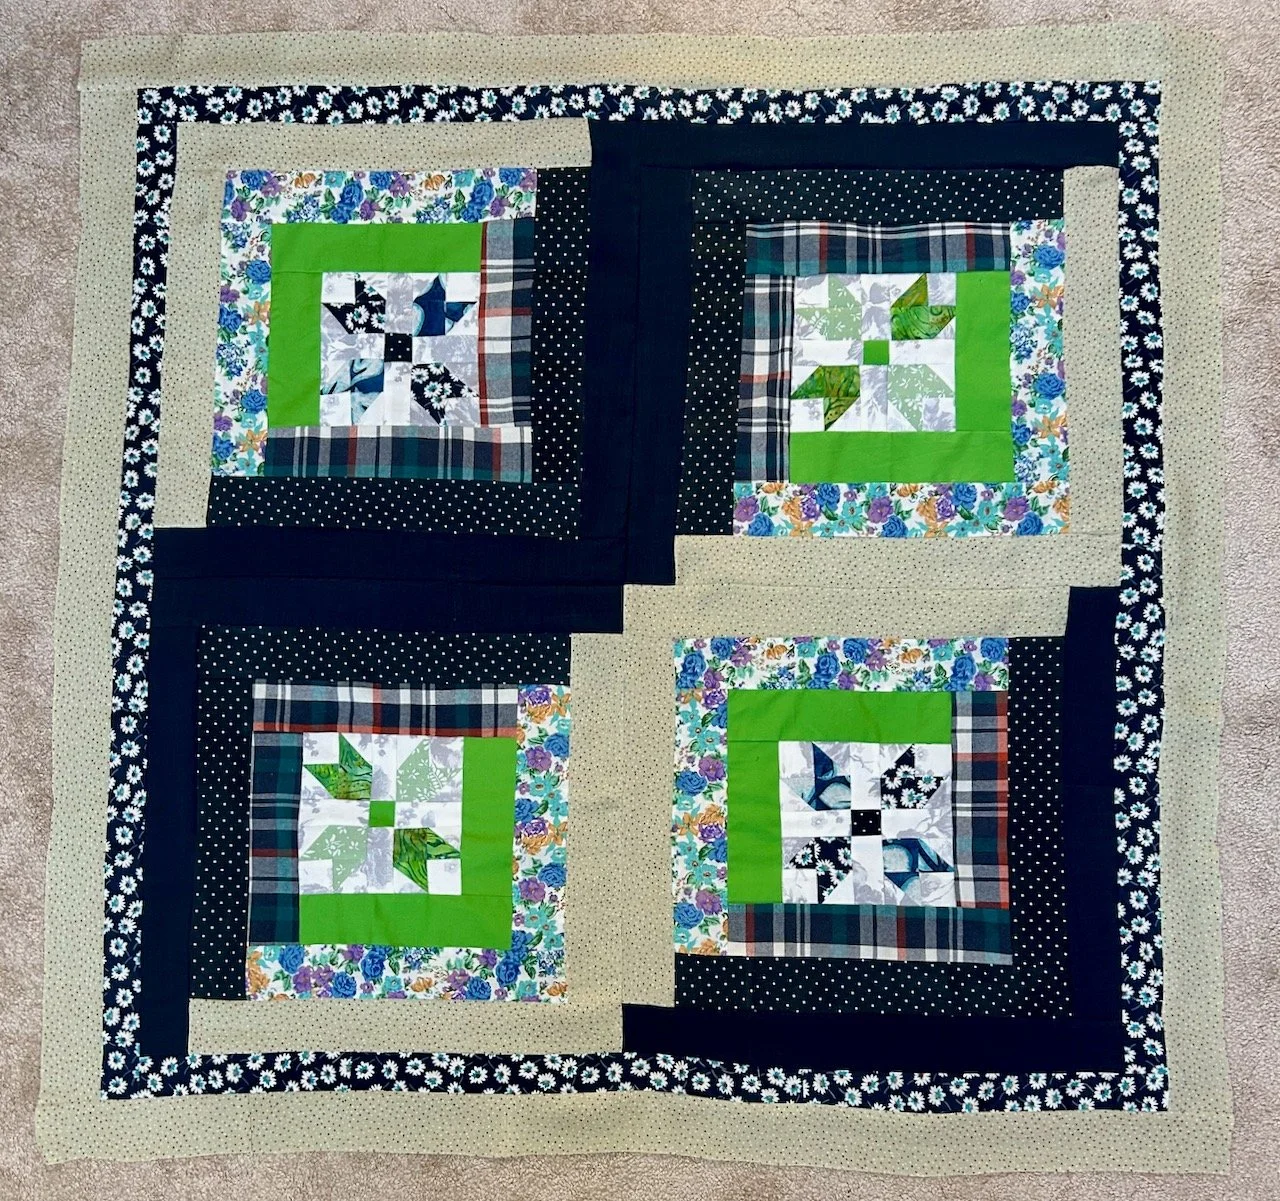
It’s taken me longer to finish this one than I’d hoped, but it’s finished and it looks great.

Before I went away I’d got all the sewing done, which left me the job of basting, quilting and binding. With the weather a little cooler, I managed to get that done in two days, just in time to start the next one!

I opted to quilt this one in vertical lines rather than the diagonal ones I mentioned above. I actually prefer this, which is good as not only was it easier and quicker to do, I was able to mark out two lines at a time - speed quilting, if you would!

Using tape to guide my quilting stitches

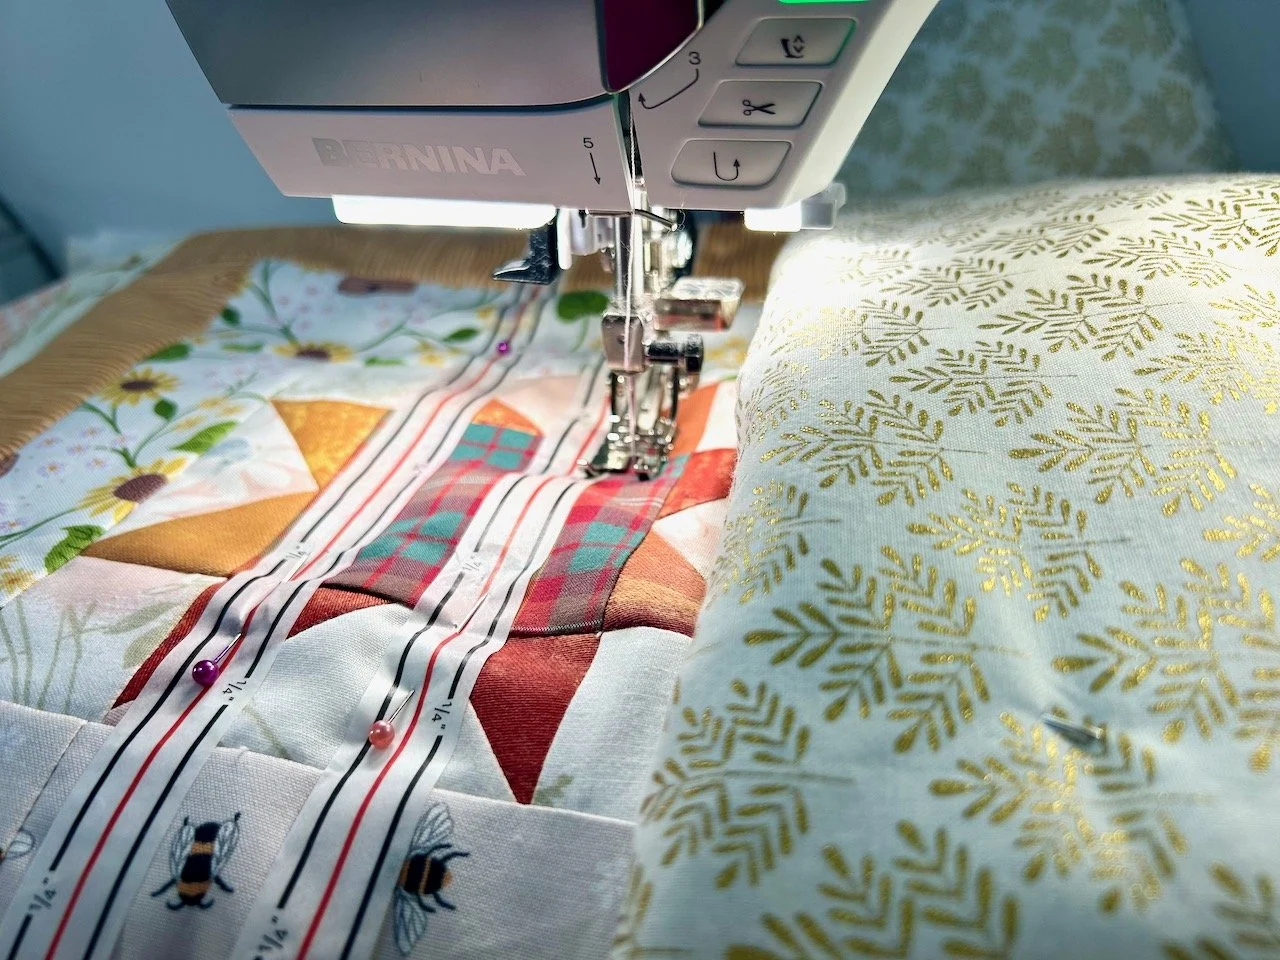
From this I learnt it’s easy to reposition the tape, but it’s also easy for the tape to move about a bit, so I’ve experimented with the optimal number of pins to keep it in place. That worked, and using the tape as a guide also worked, and so it’s something I’ll do again.

The finished - quilted and bound - friendly bee quilt

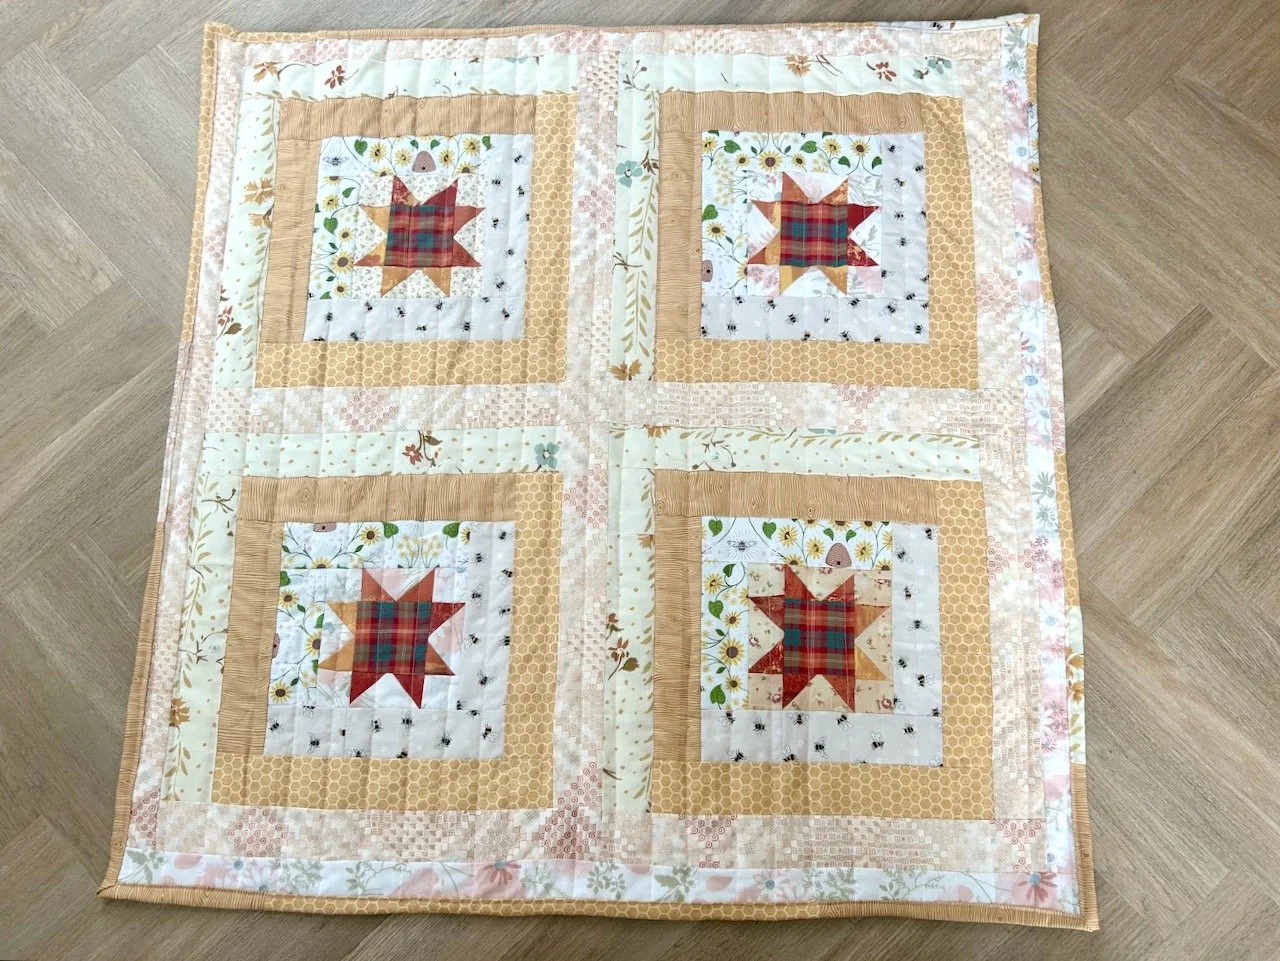
It looks pretty good doesn’t it? And way better than I could have hoped for when I pulled those mostly beiges from my stash!

You can see my other quilts which I’ve made to donate to Project Linus - a charity whose mission is to provide love, a sense of security, warmth and comfort to children, who are sick, disabled, disadvantaged or distressed through the donation of new, homemade, washable quilts and blankets, including those that are part of this ‘stretch’ project in earlier posts. I’m aiming to publish an update on my progress in the last week of each month for the remainder of 2025.

Four pink hearts and a hug

I’ve made another quilt as part of my quilting ‘stretch’ project this time using the March block from Sherri at A Quilting Life’s mystery block a month. As I said then I don’t know if I’ll manage to make a quilt a month, but I won’t really know unless I try…

I’m glad that this block was relatively simple to put together as time has been more challenging this month, perhaps the warmer weather or something else, I’m not sure quite why, but I only finished it after a concerted push last night…

My fifth donation quilt

As soon as I saw the centre block was a heart I knew that I’d be using pinks from my stash - but which ones! The pile of pinks on the right of this basket are (from top to bottom) from an old quilt cover, two old shirts, the old quilt cover again, a mystery plain pink and remnants of a much loved Boden sundress. I’ve no recollection of where the plain pink material has come from so perhaps it was part of a mystery bundle I picked up somewhere.

The paler pinks which I’m using for the hearts are likely to be much older and acquired at some point from mum’s stash, and the paler background is from the lining of the sundress. As you’ll see as this post progresses I also added some grey zigzagged material from an old duvet, which was also the backing on last month’s quilt.

Testing the block

As you know I’m making test blocks ahead of making the block for my mystery block of the month quilt and I’m making these blocks into quilts of their own. And this block has relatively few pieces compared to last month’s vintage star block, and was therefore much easier to put together, phew.

The part that required the most concentration was not to cut the wrong side of the sewn line, but I managed that successfully each time - and tbh it really wasn’t that hard, but that was the potential stumbling block (no pun intended) this month.

And in no time at all I’d added borders to the hearts, and joined the blocks together.

But I felt it wasn’t quite there yet, so left it overnight mulling over which fabrics to use for the borders. In the end I decided on a thinner red checked border before adding more of the multi-patterned pink material from the old duvet cover. I think it needed the bold checked thin border to make it work. I also knew that it needed the stripes to match as best they could to avoid it looking messy.

And with a little bit of luck that worked out.

I’ve also changed my mind on which backing to use, originally I thought it would be the multi-patterned pink fabric but I think any more of that would be too much, and so I’ve opted to cut up a paler pink single duvet cover which I bought a couple of years ago on eBay for £1.04 plus postage - as I discovered in the label I’d thoughtfully written for myself when I unfurled the fabric.

Finishing the quilt

I got the quilt to a finished quilt top level in a few days, then it sat for a while waiting for me to assemble it with the batting and backing fabric. In fact I snuck that part in ahead of waiting for family to arrive over Easter, which was a good use of time. Then after the bank holiday I set about quilting it. Remembering that the purpose of these quilts is partly to up my skill levels and to get myself comfortable with both piecing and quilting, as with practice comes a better crafter.

So rather than quilt this one as I have before I decided to quilt it in diagonal rows across the quilt, and then spent ages looking for some masking tape that I was sure I had,. I didn’t find that, but I did find some tape with marked lines on which was probably a better option, or it was once I worked out where to place it most effectively, and so I didn’t sew over it!

I also wanted to change the density of the quilting on the hearts. I considered a different colour thread, but in the end opted to add quilting lines closer together, using the same approach.

And I’m happy with how this quilting style turned out; the tape worked well and could be easily repositioned for each line of sewing. I didn’t have a plan for the spacing between the lines before I started and worked that out as soon as I started to plan the second line - they’re about 8.5cm apart. Yes they could be more precise, and ideally closer together but it was good to discover this process as I went.

The finished quilt this time with the bottom right hand corner turned back on itself to show the bagain backing fabric

It turned out well didn’t it? And four hearts and a hug seems the perfect title for this one.

You can see my other quilts which I’ve made to donate to Project Linus - a charity whose mission is to provide love, a sense of security, warmth and comfort to children, who are sick, disabled, disadvantaged or distressed through the donation of new, homemade, washable quilts and blankets, including those that are part of this ‘stretch’ project in earlier posts. I’m aiming to publish an update on my progress in the last week of each month for the remainder of 2025.

A mostly repurposed vintage star quilt

I’ve made another quilt as part of my quilting ‘stretch’ project this time using the February block from Sherri at A Quilting Life’s mystery block a month. As I said then I don’t know if I’ll manage to make a quilt a month, but I won’t really know unless I try…

I already suspect that the warmer months may be more challenging, what with adding in some time to garden as well as going out and exploring the area around where we live, but that’s the point of a challenge right.

My fourth donation quilt

When I pulled the fabrics from my stash I had no intention of making this vintage star block in blues and greens, but there you go, those are the fabrics that called to me and so that’s what I’ve got. Unlike last month I don’t have a silly name that makes me smile, but I’m pleased to have repurposed quite a few old clothes in this one.

And when I say quite a few I’ve used material from old cropped trousers of mine (from three pairs), an old shirt of MOH’s, a blouse of mine and even some from Hawaiian swimming trunks. In fact the only piece that’s remotely new is the navy and white flowered material, which I bought in Newark whilst I was collecting additional material for the flying geese quilt, before I changed my mind.

But onto the blocks

I found this block centre more challenging, right from the off - but entirely because I misread the instructions. Instead of making HSTs (half square triangles) from the smaller squares I used the larger ones and of course they didn’t come out right. So with more squares cut, and my first learning under my belt I was back on track.

Starting out wrongly with my first green star block - the pieces are all laid out but incorrectly!

My second learning came on trimming the HSTs - the rotary cutting mat made life a lot easier, as did using the small square template.

But it was still trickier than it looks. My seams were, shall we say variable, and didn’t always meet where they should. And once I’d sorted one seam’s placement another misbehaved, but I did get my four blocks (with variable seams) done, and I’m happy enough with them.

And so with the four centres complete I added the log cabin borders. My original plan had been to add a dark border but not only was I concerned it would be too dark, I also didn’t have enough of the plain blue fabric left, so I needed another plan.

I used the relatively new flowery fabric to add a border to brighten the quilt overall, and realised that there was plenty of the green spotty material (I’m sure this was a 1990s impulse buy from IKEA) to add a final border. This also brought a learning, and tested my patience, with its tendency to slip about with its own free will. But I got there.

For the backing I cut into an old duvet cover, and I think the grey and white zig zags really work - it’s definitely super soft, that’s for sure.

Once again I added my usual scrappy border, using up the majority of strips I’d cut for the quilt top. Looking at those central blocks now, I’m not looking at the wonky seams (well not so much) I’m looking at the quilt as a whole, so I’m glad it all worked out.

As I’m using these quilts to practice and refine my quilting making skills, I was keen to try something a little different with the quilting. It’s still straight(ish) lines, but instead of ‘stitching in the ditch’ I’ve gone bolder and stitched down the middle of the log cabin strip, using a navy thread - a bold move on the pale green fabric, less so on the plain navy strips!

I think it works, and overall I’m happy with how this one turned out. And as it’s been so nice I took my quilt outside for its own photoshoot in the garden! The block for my next quilt is out already, and it’s another cute one - but first I have to make my own block for my mystery block of the month quilt, all being well I’ll share that here later in the week.

You can see my other quilts which I’ve made to donate to Project Linus - a charity whose mission is to provide love, a sense of security, warmth and comfort to children, who are sick, disabled, disadvantaged or distressed through the donation of new, homemade, washable quilts and blankets, including those that are part of this ‘stretch’ project in earlier posts. I’m aiming to publish an update on my progress in the last week of each month for the remainder of 2025.